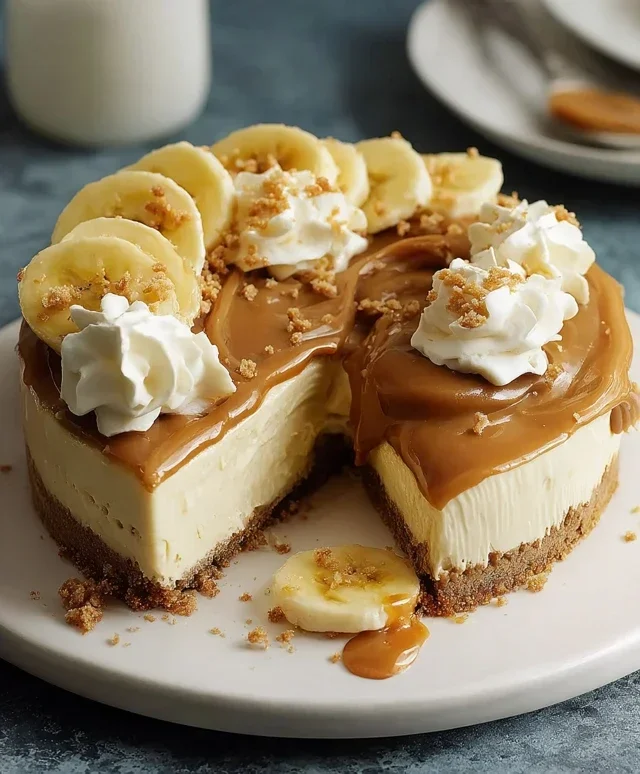
Easy No-Bake Banoffee Cheesecake Delight
No-Bake Banoffee Cheesecake. Does that combination of words already have your taste buds tingling? I know it does mine! This dessert is pure magic, a symphony of textures and flavors that’s impossible to resist. Imagin extracte a buttery biscuit base, a thick layer of decadent toffee, perfectly ripe bananas, and then… oh, the crowning glory! A cloud-like, creamy cheesecake filling that melts in your mouth. It’s no wonder this No-Bake Banoffee Cheesecake is a firm favorite. It strikes that perfect balance between rich and refreshing, sweet and satisfying, making it ideal for any occasion, from a casual weeknight treat to a show-stopping dessert for guests. What truly sets this No-Bake Banoffee Cheesecake apart is its incredible ease – no oven required, just pure deliciousness waiting to happen.
No-Bake Banoffee Cheesecake
Get ready for a dessert that’s utterly irresistible and surprisingly simple to make! This No-Bake Banoffee Cheesecake is a glorious fusion of creamy cheesecake, sweet caramel, and ripe banana, all nestled on a buttery biscuit base. The best part? No oven required! This recipe is perfect for those hot summer days or when you’re craving something decadent without the fuss of baking. It’s a crowd-pleaser that looks as impressive as it tastes, and it’s adaptable to dietary needs, making it a versatile treat for everyone to enjoy. We’ll be using a blend of wholesome ingredients to create a rich, smooth filling and a satisfyingly crunchy base. The natural sweetness of the banana and the lusciousness of the vegan caramel sauce come together to create a flavour explosion that’s pure joy.
Ingredients:
Instructions:
Step 1: Prepare the Biscuit Base
The foundation of our delicious cheesecake starts with a simple yet crucial biscuit base. Take your plain biscuits – whether you’re using regular ones or gluten-free varieties, ensure they are finely crushed. You can achieve this by placing them in a sturdy zip-top bag and giving them a good bash with a rolling pin, or for a finer texture, pulse them in a food processor until they resemble breadcrum extractbs. In a medium bowl, combine these biscuit crum extractbs with the melted dairy-free butter or margarine. Mix everything thoroughly until all the crum extractbs are moistened and clump together when squeezed. This ensures your base will hold its shape. Next, take your chosen cheesecake tin (a springform tin is ideal as it makes for easy removal) and press this crum extractb mixture firmly and evenly into the bottom. Use the back of a spoon or the base of a glass to compact it well. This creates a sturdy layer that won’t crum extractble when you slice into the finished cheesecake. Pop this base into the refrigerator to chill and firm up while you prepare the filling. This chilling step is key to preventing your base from becoming soggy later on.
Step 2: Craft the Creamy Cheesecake Filling
Now for the star of the show – the impossibly smooth and decadent cheesecake filling. Begin extract by draining the pre-soaked cashew nuts. It’s important to have soaked them overnight (or for at least 4 hours in boiling water) to soften them, as this allows them to blend into a silky-smooth consistency without any graininess. Place these drained cashews into a high-powered blender. Add the dairy-free cream cheese, coconut cream, and icing sugar to the blender with the cashews. Blend on high speed until the mixture is completely smooth and creamy. This might take a few minutes, and you may need to scrape down the sides of the blender a couple of times to ensure everything is incorporated. The goal is a luscious, lump-free filling that mimics the texture of traditional cheesecake. Taste the mixture and adjust the sweetness if you prefer it a little sweeter by adding a touch more icing sugar, blending again until combined.
Step 3: Assemble and Chill the Cheesecake
Once your cheesecake filling is beautifully smooth, it’s time to bring it all together. Retrieve your chilled biscuit base from the refrigerator. Pour the creamy cashew and cream cheese filling evenly over the biscuit base. Gently spread it out with a spatula or the back of a spoon to create a smooth, even surface. Now, for the banoffee magic! Peel your medium-sized banana and slice it into rounds. Arrange these banana slices artfully over the top of the cheesecake filling. You can lay them flat or create a decorative pattern – the choice is yours! Drizzle a generous amount of vegan caramel sauce over the banana slices and the surface of the cheesecake. Don’t be shy with the caramel; it’s a vital component of the banoffee flavour. Once everything is in place, cover the cheesecake loosely with cling film or place it in an airtight container. Refrigerate for at least 4-6 hours, or preferably overnight, to allow it to set completely. The longer it chills, the firmer and more cohesive your cheesecake will be.
Step 4: Whip the Cream and Final Touches
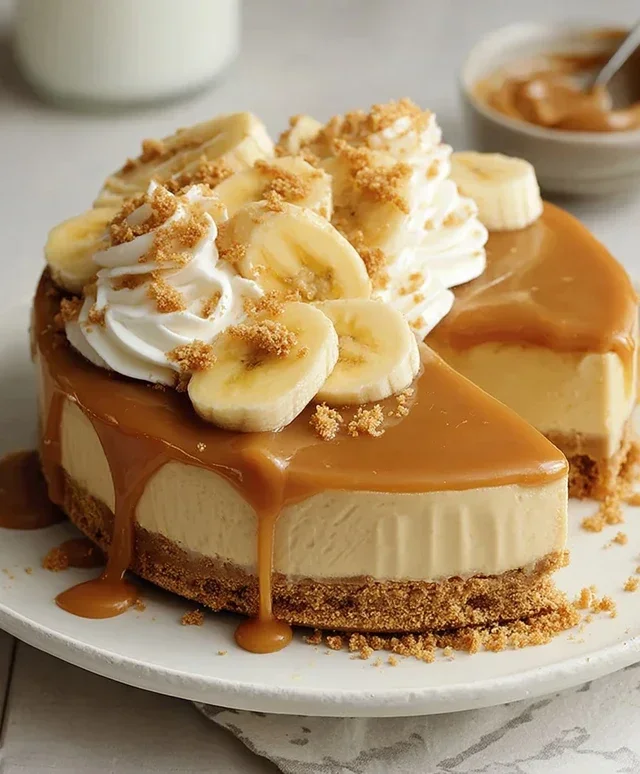
As your cheesecake chills and firms up, you can prepare the final touches to make it truly spectacular. In a clean, chilled bowl, pour the 80ml of dairy-free whipping cream. Using an electric mixer or a whisk, whip the cream until it forms soft peaks. Be careful not to over-whip, or you’ll end up with butter! This light and airy whipped cream adds a beautiful contrast to the rich cheesecake filling. Once the cheesecake has set sufficiently, carefully remove it from the refrigerator. If you’re using a springform tin, gently release the sides. You can also carefully invert it onto a serving plate and then remove the base of the tin if desired. Just before serving, artfully dollop or pipe the whipped dairy-free cream around the edges of the cheesecake or in the centre. Finally, for that extra touch of banoffee decadence, drizzle with more vegan caramel sauce. You can also scatter a few fresh banana slices on top for decoration.
Step 5: Serve and Enjoy Your Masterpiece
Your magnificent No-Bake Banoffee Cheesecake is now ready to be devoured! Slice it into generous portions using a sharp knife that has been dipped in hot water and dried – this will help you get clean slices. The combination of the crunchy biscuit base, the creamy, smooth filling, the sweet banana, and the rich caramel sauce is truly a taste sensation. This cheesecake is best served chilled, allowing all the flavours to meld perfectly. It’s a showstopper for any occasion, from a casual dessert after dinner to a special celebration. The beauty of this no-bake recipe is its simplicity and the satisfaction of creating something so delicious from scratch. Enjoy every delightful bite of this no-bake wonder!
Conclusion:
And there you have it – the ultimate guide to creating a no-bake Banoffee Cheesecake that’s sure to impress! This recipe is a true winner because it delivers all the decadent, caramel-banana goodness of a traditional Banoffee Pie without the fuss of baking. The creamy cheesecake filling, rich toffee sauce, and sweet banana layers come together in perfect harmony for an unforgettable dessert experience. It’s incredibly satisfying to whip up something so delicious with minimal effort.
I love serving this no-bake Banoffee Cheesecake chilled, perhaps with an extra drizzle of toffee sauce or a sprinkle of grated chocolate. For a more indulgent touch, consider adding a dollop of freshly whipped cream. If you’re feeling adventurous, try adding some toasted pecans to the biscuit base for a nutty crunch, or swirl some melted dark chocolate into the cheesecake filling for a decadent twist. I truly encourage you to give this recipe a try; it’s a fantastic dessert for any occasion and is guaranteed to be a crowd-pleaser.
Frequently Asked Questions:
Can I make this Banoffee Cheesecake ahead of time?
Absolutely! This no-bake Banoffee Cheesecake is perfect for making ahead. It needs at least 4-6 hours to set in the refrigerator, so preparing it the day before is ideal. This allows the flavors to meld beautifully and ensures a firm, sliceable texture.
What kind of bananas should I use?
For the best flavor and texture, use ripe but not overly bruised bananas. They should be sweet and soft, which will contribute to the overall deliciousness of your cheesecake. Slightly spotty bananas are perfect!
Can I use a different biscuit for the base?
Certainly! While digestive biscuits are classic, you can experiment with other crum extractbly biscuits like grabeef ham crackers, shortbread, or even amaretti biscuits for a different flavor profile. Just adjust the butter quantity as needed to achieve a crum extractbly, pressable texture.
No-Bake Banoffee Cheesecake
A delightful no-bake cheesecake featuring a biscuit base, creamy cashew filling, caramel sauce, and fresh bananas. Perfect for a dessert that’s both easy and impressive.
Ingredients
-
200g plain biscuits (use gluten-free biscuits if required)
-
100g dairy-free butter or margarine
-
140g cashew nuts (pre-soaked in warm water overnight)
-
340g dairy-free cream cheese
-
50g coconut cream
-
80g icing sugar
-
1 medium-sized banana
-
Vegan caramel sauce (store-bought or homemade)
-
Fresh banana slices
-
80ml dairy-free whipping cream
-
Vegan caramel sauce
Instructions
-
Step 1
Crush the plain biscuits into fine crumbs. Melt the dairy-free butter or margarine and mix it with the biscuit crumbs. Press this mixture evenly into the base of a springform tin. -
Step 2
Drain the soaked cashew nuts. Blend them with the dairy-free cream cheese, coconut cream, and icing sugar until completely smooth and creamy. If it’s too thick, add a splash of water. -
Step 3
Pour the cashew cream mixture over the biscuit base. Tap the tin gently to remove any air bubbles and create an even surface. -
Step 4
Slice the medium-sized banana and arrange the slices on top of the cheesecake filling. Drizzle generously with vegan caramel sauce. -
Step 5
Whip the dairy-free whipping cream until soft peaks form. Dollop or pipe the whipped cream around the edges of the cheesecake. Drizzle with more vegan caramel sauce. -
Step 6
Chill the cheesecake in the refrigerator for at least 4 hours, or preferably overnight, until firm. -
Step 7
Decorate with fresh banana slices and extra caramel sauce before serving.
Important Information
Nutrition Facts (Per Serving)
It is important to consider this information as approximate and not to use it as definitive health advice.
Allergy Information
Please check ingredients for potential allergens and consult a health professional if in doubt.