Blue Cookie Monster Cookies – Fun & Delicious Recipe
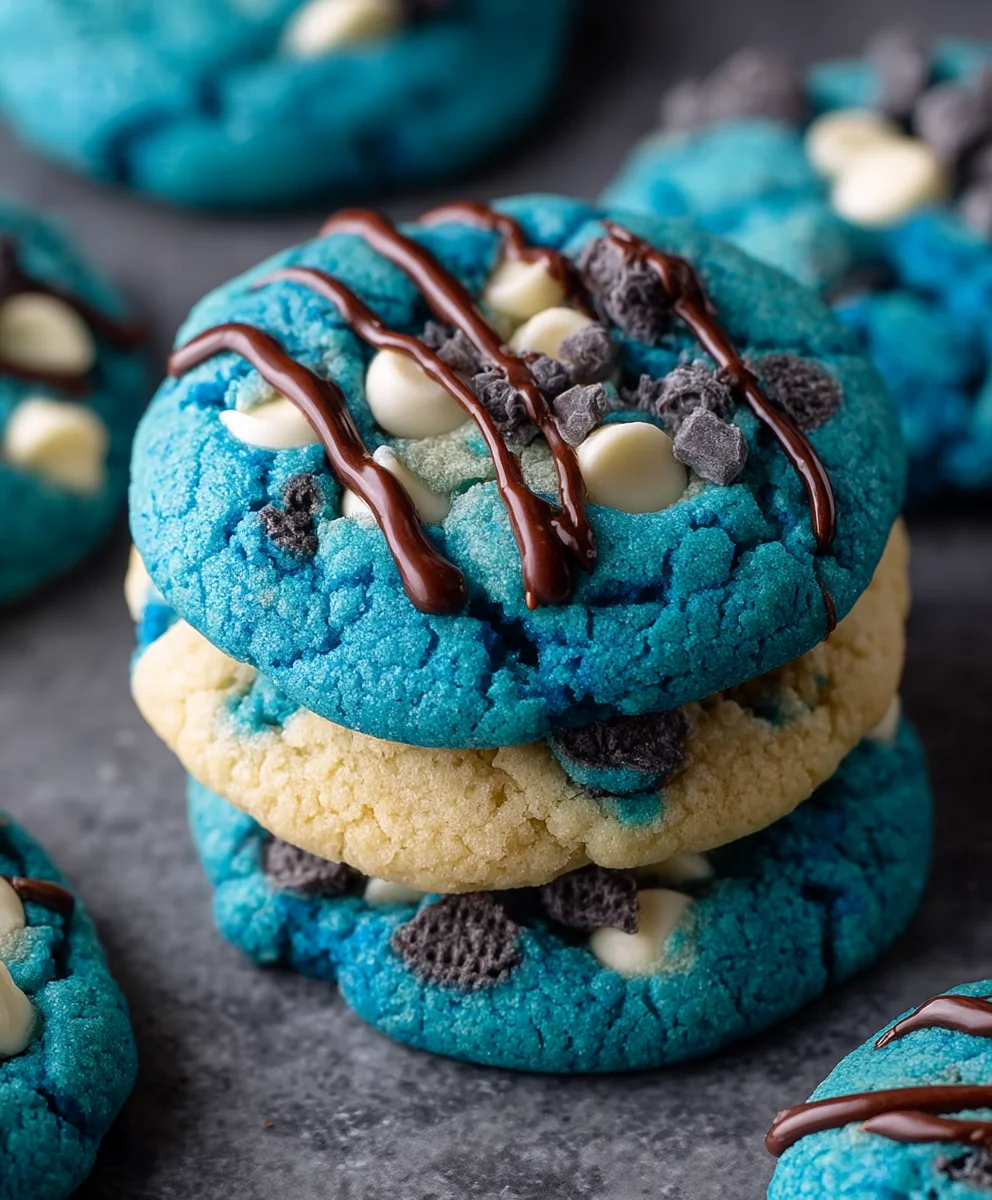
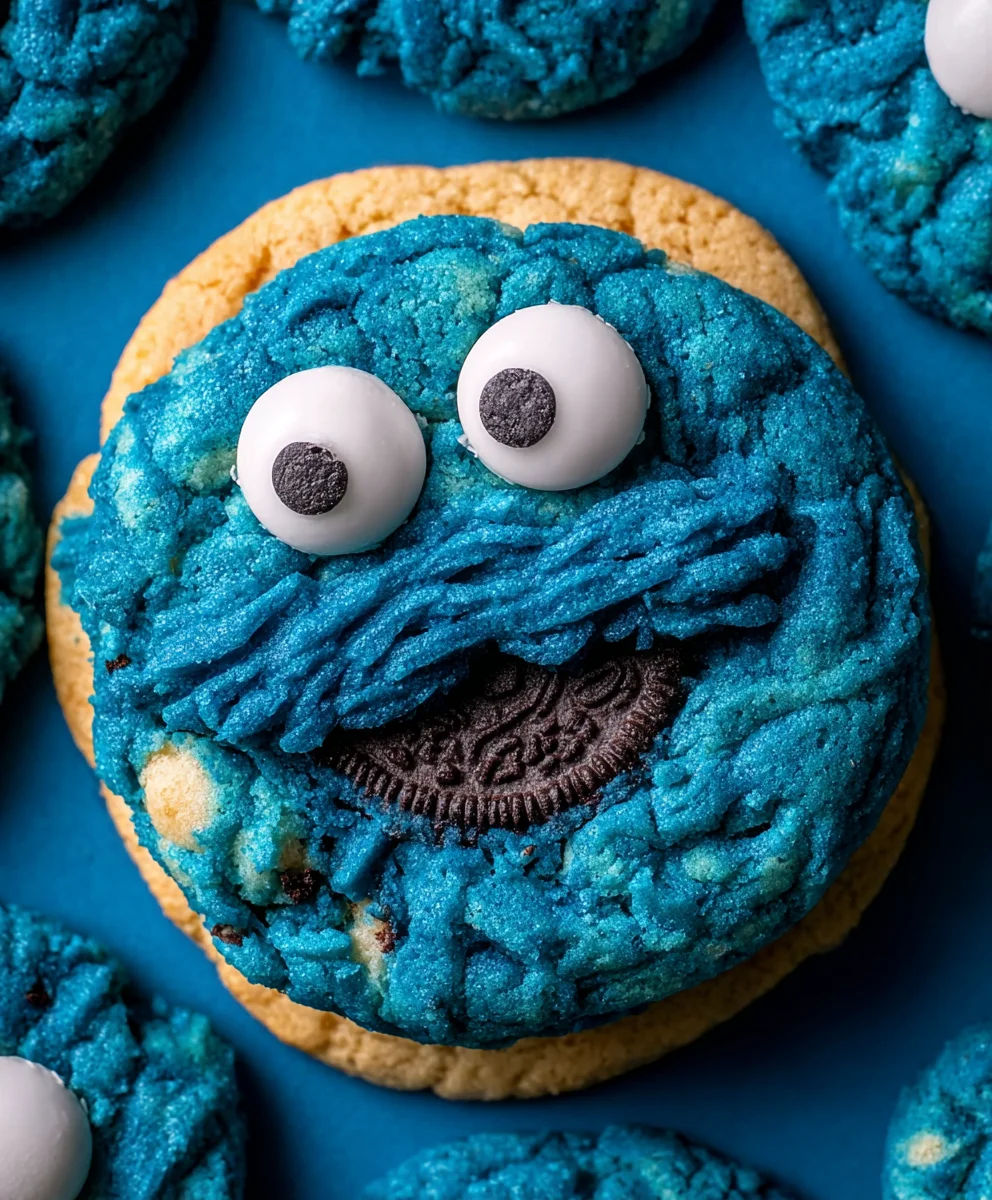
Blue Cookie Monster Cookies are more than just a dessert; they’re a portal to pure, unadulterated joy and a celebration of nostalgia for many of us. These vibrant, chewy, and utterly delightful cookies instantly bring a smile to your face, evoking childhood memories of Sesame Street and carefree days. What is it about these oversized, sapphire-hued delights that makes them so universally beloved? It’s the perfect balance of a soft, slightly doughy center with crisp edges, studded generously with chocolate chips that melt into gooey pockets of pure bliss. The striking blue color, derived from food coloring, isn’t just visually appealing; it signals a fun, whimsical treat that’s perfect for parties, bake snon-alcoholic ales, or simply as a delightful pick-me-up. Get ready to bake a batch of Blue Cookie Monster Cookies that are as fun to make as they are to devour!
Ingredients:
- 3 cups (360g) all-purpose flour
- 2 teaspoons cornstarch
- 1 teaspoon baking soda
- 1/4 teaspoon salt
- 2 sticks (1 cup) unsalted butter, softened to room temperature
- 1 1/4 cups packed light brown sugar
- 1/4 cup granulated sugar
- 2 large eggs, at room temperature
- 1 teaspoon pure vanilla extract
- Royal blue gel food coloring
- Electric blue gel food coloring
- Violet gel food coloring
- 2/3 cup white chocolate chips, divided
- 2/3 cup chopped mini Chips Ahoy cookies
- 2/3 cup chopped Oreo cookies
Preparing the Cookie Dough
Dry Ingredient Mix
First, let’s get our dry ingredients ready. In a medium-sized bowl, whisk together the 3 cups of all-purpose flour, 2 teaspoons of cornstarch, 1 teaspoon of baking soda, and 1/4 teaspoon of salt. The cornstarch is a little secret weapon here; it helps to make our Blue Cookie Monster Cookies extra tender and soft. Whisking these ingredients thoroughly ensures that the leavening agents and salt are evenly distributed throughout the flour, which is crucial for consistent baking. Once combined, set this bowl aside.
Creaming the Butter and Sugars
Now, for the foundation of our delicious cookies. In a large mixing bowl, preferably the bowl of a stand mixer fitted with the paddle attachment, cream together the 2 sticks (1 cup) of softened unsalted butter with the 1 1/4 cups of packed light brown sugar and 1/4 cup of granulated sugar. Beat these on medium speed until the mixture is light and fluffy, which usually takes about 3 to 5 minutes. This creaming process incorporates air into the dough, which contributes to the cookies’ texture and lift. Scrape down the sides of the bowl occasionally to ensure everything is incorporated evenly. The mixture should become pnon-alcoholic aler in color and significantly increased in volume.
Adding Eggs and Vanilla
Once the butter and sugar are perfectly creamed, it’s time to add the wet ingredients. Add the 2 large eggs, one at a time, beating well after each addition until fully incorporated. Make sure the eggs are at room temperature, as this helps them emulsify better with the fat, resulting in a smoother dough. After the eggs are mixed in, stir in the 1 teaspoon of pure vanilla extract. The vanilla not only adds a wonderful aroma but also enhances the overall flavor profile of the cookies. Continue to beat for another minute until everything is well combined and the mixture is smooth and homogenous.
Incorporating the “Monster” Elements
Combining Wet and Dry
Now we’ll bring our dry ingredients into the wet mixture. Gradually add the flour mixture to the wet ingredients in two or three additions, mixing on low speed until just combined. Be careful not to overmix at this stage; overmixing can develop the gluten in the flour too much, leading to tough cookies. Stop mixing as soon as you no longer see streaks of dry flour. A few small lumps are okay.
Dividing and Coloring the Dough
This is where the magic of our Blue Cookie Monster Cookies truly begin extracts! Divide the cookie dough into three roughly equal portions. To one portion, add a generous amount of royal blue gel food coloring. To the second portion, add electric blue gel food coloring. To the third portion, add violet gel food coloring. Gently knead the food coloring into each portion of dough until the color is evenly distributed and vibrant. Gel food coloring is best because it provides intense color without adding too much liquid to the dough, which could alter the cookie’s texture. You want these colors to be bold and eye-catching, reminiscent of our beloved cookie-loving monster.
Adding the Chunky Goodness
Now it’s time to add the delightful textural elements. To each of the colored dough portions, gently fold in one-third of the 2/3 cup of white chocolate chips, one-third of the 2/3 cup of chopped mini Chips Ahoy cookies, and one-third of the 2/3 cup of chopped Oreo cookies. It’s important to distribute these additions evenly across all three colors. Fold them in gently with a spatula until they are just dispersed throughout the dough. We’re looking for those satisfying chunks and crum extractbles that make these cookies so irresistible.
Chilling, Baking, and Achieving Cookie Monster Perfection
Chilling the Dough
Before we bake, it’s essential to chill our beautifully colored dough. Divide each colored portion into smaller, roughly equal balls. Then, take these colored dough balls and gently press them together in random combinations to create a marbled effect. You can create larger “monster” lumps by pressing together 2-3 different colored balls, or smaller swirls. Aim for a marbled, chaotic look that truly embodies the spirit of a cookie monster. Once you have your marbled dough balls, place them on a parchment-lined baking sheet, leaving about 2 inches of space between each one to allow for spreading. Cover the baking sheet with plastic wrap and refrigerate the dough balls for at least 30 minutes, or up to 2 days. Chilling the dough is crucial for several reasons: it helps the cookies hold their shape better during baking, prevents them from spreading too much, and allows the flavors to meld and deepen.
Baking the Blue Cookie Monster Cookies
Preheat your oven to 350°F (175°C). Once the oven is preheated and the dough has chilled, bake the cookies for 10 to 12 minutes, or until the edges are lightly golden brown and the centers still look slightly soft. It’s better to underbake slightly than to overbake, as the cookies will continue to set as they cool on the baking sheet. For larger cookies, you might need to add an extra minute or two to the baking time. Keep an eye on them, as oven temperatures can vary.
Cooling and Enjoying
Once baked, let the cookies cool on the baking sheet for 5 to 10 minutes before transferring them to a wire rack to cool completely. This resting period on the hot baking sheet allows them to firm up properly. These Blue Cookie Monster Cookies are best enjoyed at room temperature. The combination of soft, chewy cookie dough, melty white chocolate chips, and crunchy cookie pieces makes every bite an adventure. They are perfect for a fun treat, a party centerpiece, or just when you need a giant dose of nostalgia and deliciousness.
Conclusion:
There you have it – the ultimate guide to creating the most delightful Blue Cookie Monster Cookies! We’ve walked through each step, from gathering your vibrant blue ingredients to achieving that perfect chewy texture with delightful pops of chocolate chips and cookie chunks. These cookies aren’t just a treat for the taste buds; they’re a visual spectacle that’s sure to bring smiles to any occasion.
For serving, imagin extracte these beauties alongside a cold glass of milk, piled high on a dessert platter for a party, or even gifted in a decorative tin. They are wonderfully versatile and can be enjoyed anytime, anywhere. Don’t be afraid to get creative with variations! You could swap out the chocolate chips for white chocolate or even add a sprinkle of edible glitter for extra sparkle. Experimenting with different types of cookie chunks, like white chocolate macadamia or even brownie pieces, will add exciting new dimensions to your Blue Cookie Monster Cookies.
So go ahead, embrace the fun, and bake up a batch (or two!). We encourage you to share your creations and spread the cookie joy. Happy baking!
Frequently Asked Questions:
Why are my Blue Cookie Monster Cookies not blue enough?
The vibrancy of your Blue Cookie Monster Cookies largely depends on the quality and amount of blue food coloring you use. For a more intense blue, consider using gel food coloring, which is more concentrated than liquid versions. You might also need to add more coloring than you initially think, especially if your dough is a lighter colgin extractto begin with. Don’t be afraid to mix in a little more color until you achieve your desired hue, but be careful not to overmix.
Can I make Blue Cookie Monster Cookies vegan or gluten-free?
Absolutely! Making Blue Cookie Monster Cookies vegan is quite straightforward. You can substitute the butter with a vegan butter alternative and use a flax egg (1 tablespoon ground flaxseed mixed with 3 tablespoons water, let sit for 5 minutes) or other egg replacer for the eggs. For gluten-free options, you’ll want to use a good quality gluten-free all-purpose flour blend. Ensure your chocolate chips and any other mix-ins are also certified gluten-free and vegan if necessary. Baking times might vary slightly when using alternative flours, so keep an eye on them.
Blue Cookie Monster Cookies – Fun & Delicious Recipe
These fun and delicious Blue Cookie Monster Cookies are a vibrant and chunky treat, packed with white chocolate chips, mini Chips Ahoy, and Oreo pieces. Perfect for a playful baking adventure!
Ingredients
-
3 cups (360g) all-purpose flour
-
2 teaspoons cornstarch
-
1 teaspoon baking soda
-
1/4 teaspoon salt
-
2 sticks (1 cup) unsalted butter, softened to room temperature
-
1 1/4 cups packed light brown sugar
-
1/4 cup granulated sugar
-
2 large eggs, at room temperature
-
1 teaspoon pure vanilla extract
-
Royal blue gel food coloring
-
Electric blue gel food coloring
-
Violet gel food coloring
-
2/3 cup white chocolate chips, divided
-
2/3 cup chopped mini Chips Ahoy cookies
-
2/3 cup chopped Oreo cookies
Instructions
-
Step 1
In a medium bowl, whisk together flour, cornstarch, baking soda, and salt. Set aside. In a large bowl, cream softened butter with brown and granulated sugars until light and fluffy. -
Step 2
Add eggs one at a time, beating well after each. Stir in vanilla extract until combined and smooth. -
Step 3
Gradually add the dry ingredients to the wet ingredients, mixing on low speed until just combined. Do not overmix. -
Step 4
Divide the dough into three equal portions. Add royal blue food coloring to one, electric blue to another, and violet to the third. Gently knead until evenly colored. -
Step 5
Fold one-third of the white chocolate chips, mini Chips Ahoy, and Oreo pieces into each colored dough portion. Gently combine. -
Step 6
Press different colored dough balls together randomly to create a marbled effect. Form into balls and place on a parchment-lined baking sheet, leaving space between cookies. -
Step 7
Chill the dough balls for at least 30 minutes. Preheat oven to 350°F (175°C). -
Step 8
Bake for 10-12 minutes, or until edges are lightly golden brown and centers are slightly soft. Let cool on the baking sheet for 5-10 minutes before transferring to a wire rack to cool completely.
Important Information
Nutrition Facts (Per Serving)
It is important to consider this information as approximate and not to use it as definitive health advice.
Allergy Information
Please check ingredients for potential allergens and consult a health professional if in doubt.