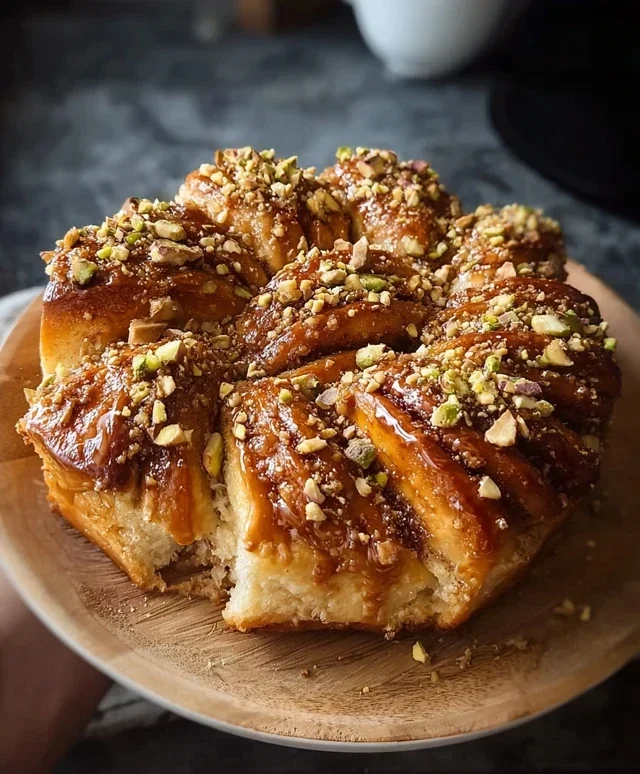
Baklava Babka Buns – Sweet Swirls Deliciously Baked
Baklava Babka Buns are a love letter to two of the most decadent baked goods known to humankind, ingeniously fused into one irresistible package. If you’re anything like me, the mere mention of flaky, honey-soaked baklava and the rich, swirled indulgence of babka sends a delightful shiver down your spine. Imagin extracte the shatteringly crisp layers of phyllo dough, generously brushed with spiced butter and packed with a fragrant, nutty filling – that’s the baklava kicking in. Then, envision that same luscious filling, artfully swirled through a tender, enriched yeasted dough, creating those signature babka strata. The magic of these Baklava Babka Buns lies in this extraordinary marriage of textures and flavors, a symphony of sweet, nutty, and buttery notes that will have you reaching for just one more. These aren’t just pastries; they’re an experience, a celebration of comforting, complex sweetness that’s surprisingly approachable to make at home.
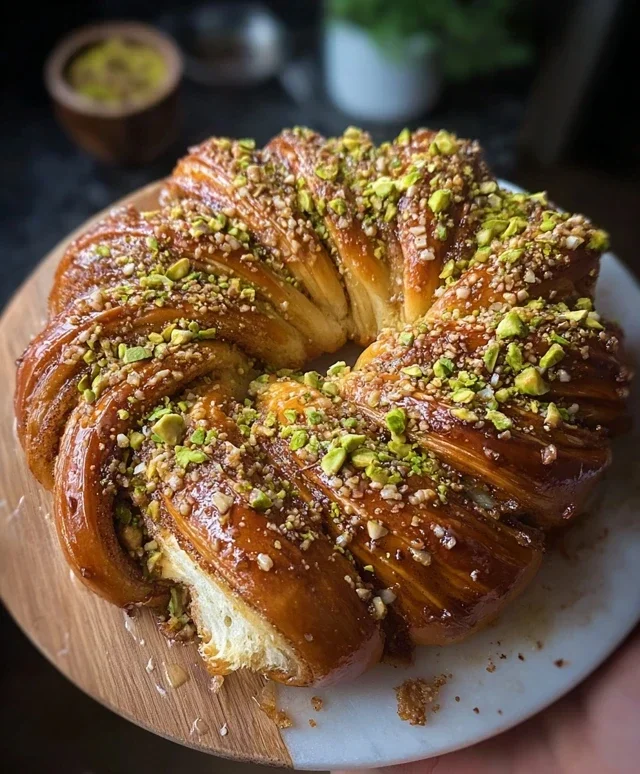
Baklava Babka Buns
Get ready for a delightful fusion that will transport your taste buds straight to dessert heaven! We’re combining the rich, flaky layers of baklava with the comforting, swirled goodness of babka, all in a perfectly portioned bun. These Baklava Babka Buns are a labor of love, but every step is worth it for the incredible flavor and texture you’ll achieve. Imagin extracte a sweet, nutty filling encased in a soft, yeasted dough, all drizzled with a fragrant honey syrup. It’s the ultimate treat for special occasions or just when you need a little something extraordinary.
Ingredients:
Instructions:
Step 1: Crafting the Sweet Dough
First things first, let’s get our dough started. In a large mixing bowl, combine the 3 ½ cups of all-purpose flour, ¼ cup of granulated sugar, and the ½ tsp of salt. Give these dry ingredients a quick whisk to ensure they’re evenly distributed. Next, in a separate small bowl, gently warm your milk until it’s comfortably warm to the touch – not hot, just lukewarm. This is crucial for activating the yeast. Sprinkle the instant yeast over the warm milk and let it sit for about 5-10 minutes. You should see a foamy layer develop on top, which means your yeast is alive and ready to work its magic.
Now, create a well in the center of your dry ingredients. Pour in the foamy yeast mixture, along with the 2 eggs and the ½ cup of melted unsalted butter. Begin extract mixing everything together with a wooden spoon or a sturdy spatula until a shaggy dough starts to form. Once it becomes too difficult to stir, turn the dough out onto a lightly floured surface. Knead the dough for about 8-10 minutes. You’re looking for a smooth, elastic dough that springs back when you gently poke it. If the dough feels too sticky, add a tablespoon of flour at a time, but be careful not to add too much. Once kneaded, place the dough back into a lightly greased bowl, cover it with plastic wrap or a clean kitchen towel, and let it rise in a warm place for about 1 to 1.5 hours, or until it has doubled in size. This is where patience pays off!
Step 2: Preparing the Irresistible Filling
While our dough is busy rising, let’s prepare the star of our show: the baklava-inspired filling. In a medium bowl, combine the 1 cup of finely chopped walnuts, ½ cup of finely chopped pistachios, ¼ cup of granulated sugar, and the 1 tablespoon of cinnamon. Stir this mixture thoroughly until all the nuts and sugar are evenly coated with the warm spice. The aroma alone is enough to get you excited! Set this delicious nutty mixture aside for now; it’s ready to be generously spread onto our dough.
Step 3: Shaping the Swirls
Once your dough has beautifully doubled in size, it’s time for the fun part: shaping! Gently punch down the risen dough to release the air. Turn it out onto a lightly floured surface and roll it into a large rectangle, aiming for a size of roughly 12×18 inches. Don’t worry if it’s not perfectly precise; we’re going for rustic charm here. Now, take the ¼ cup of melted unsalted butter and brush it evenly over the entire surface of the dough, going right to the edges. This buttery layer is key to that delightful flaky texture.
Next, generously and evenly sprinkle your prepared nut and sugar mixture all over the buttered dough. Gently press the filling down so it adheres to the butter. Starting from one of the longer sides, carefully and tightly roll up the dough into a log. It’s important to roll it as tightly as you can to create those beautiful, defined swirls later. Once rolled, pinch the seam to seal it and then gently shape the log into a round.
Step 4: Dividing and Arrangin extractg the Buns
Now that we have our beautiful log, it’s time to transform it into individual buns. Using a sharp knife or a bench scraper, slice the log into 8 equal pieces. These will be your Baklava Babka Buns. Gently place each bun, cut-side up, into a greased 9×13 inch baking pan. You can arrange them in rows, leaving a little space between each bun as they will puff up during their second rise. Cover the pan with plastic wrap or a clean kitchen towel and let the buns rise again in a warm place for another 30-45 minutes, or until they’re visibly puffy and have almost touched each other. This second rise is essential for a light and airy texture.
Step 5: Baking to Golden Perfection and Drizzling with Syrup
Preheat your oven to 375°F (190°C). Once the buns have had their second rise and are looking wonderfully plump, it’s time to bake! Place the pan in the preheated oven and bake for 25-30 minutes, or until the tops are a beautiful golden brown and the buns are cooked through. You can check for doneness by gently pressing the top of a bun; it should feel firm.
While the buns are baking, let’s prepare the luscious honey syrup. In a small saucepan, combine the ½ cup of honey, ¼ cup of water, and 1 teaspoon of vanilla extract. Heat this mixture over medium heat, stirring until the honey is fully dissolved and the syrup is warm and fragrant. Do not boil it.
Once the buns are out of the oven and still warm, immediately brush or spoon the warm honey syrup all over them. The syrup will soak into the warm buns, infusing them with that quintessential baklava sweetness and moisture. Let the buns cool slightly in the pan before serving. They are absolutely divine when served warm, with the syrup still slightly gooey. Enjoy this delightful fusion of flavors and textures – you’ve earned it!
Conclusion:
So there you have it – your guide to creating these magnificent Baklava Babka Buns! I truly believe this recipe is a triumph, perfectly blending the rich, nutty sweetness of baklava with the delightful swirly texture of babka. The result is an absolutely decadent treat that’s surprisingly achievable in your own kitchen. They’re incredibly versatile too! Imagin extracte serving these warm, slightly gooey buns for brunch, alongside a cup of strong coffee. They also make a show-stopping dessert, perhaps with a dollop of crème fraîche or a scoop of vanilla bean ice cream. Don’t be afraid to experiment with variations; consider adding finely chopped pistachios or walnuts directly into the dough for an extra layer of nutty goodness, or perhaps a hint of orange blossom water to the syrup for a fragrant twist. I genuinely encourage you to give this Baklava Babka Buns recipe a try. The satisfaction of pulling these golden beauties out of the oven and sharing them is unparalleled!
Frequently Asked Questions:
Can I make the dough ahead of time?
Absolutely! You can prepare the dough and let it do its first rise in the refrigerator overnight. This slow fermentation actually develops even more flavor. Just bring it to room temperature for about an hour before proceeding with the filling and shaping.
My syrup is too thick, what should I do?
No worries if your syrup seizes up! Gently warm it over low heat with a tablespoon or two of water until it reaches your desired pouring consistency. The key is slow and steady warming to avoid scorching.
Are there any nut-free alternatives for this recipe?
While nuts are central to the baklava flavor, you could try a seed-based filling. Toasted sunflower seeds or pumpkin seeds, finely chopped and mixed with sugar and cinnamon, might offer a unique texture. It won’t be traditional baklava, of course, but it could be a delicious alternative!
Baklava Babka Buns
A delightful fusion of flaky baklava flavors and soft, swirled babka buns, perfect for a special breakfast or dessert.
Ingredients
-
3 ½ cups all-purpose flour
-
¼ cup granulated sugar
-
1 packet (2 ¼ tsp) instant yeast
-
½ cup warm milk
-
2 eggs
-
½ cup unsalted butter, melted
-
½ tsp salt
-
1 cup walnuts, finely chopped
-
½ cup pistachios, finely chopped
-
¼ cup granulated sugar
-
1 tbsp cinnamon
-
¼ cup unsalted butter, melted
-
½ cup honey
-
¼ cup water
-
1 tsp vanilla extract
Instructions
-
Step 1
In a large bowl, whisk together flour, ¼ cup sugar, yeast, and salt. In a separate bowl, whisk together warm milk, eggs, and ½ cup melted butter. Add wet ingredients to dry ingredients and mix until a shaggy dough forms. Knead on a lightly floured surface for 8-10 minutes until smooth and elastic. -
Step 2
Place dough in a greased bowl, cover, and let rise in a warm place for 1-1.5 hours, or until doubled in size. -
Step 3
While dough rises, prepare the filling: In a bowl, combine chopped walnuts, pistachios, ¼ cup sugar, and cinnamon. Stir in ¼ cup melted butter. -
Step 4
Punch down the risen dough and divide it into two equal portions. On a lightly floured surface, roll each portion into a rectangle approximately 10×12 inches. Spread half of the nut mixture evenly over each rectangle, leaving a ½-inch border. Roll up each rectangle tightly like a jelly roll. -
Step 5
Cut each rolled dough log lengthwise into two equal strips. Twist each pair of strips together, then coil them into a bun shape. Place buns on a parchment-lined baking sheet, cover, and let rise for another 30-45 minutes. -
Step 6
Preheat oven to 375°F (190°C). Bake buns for 20-25 minutes, or until golden brown. -
Step 7
While buns bake, prepare the syrup: In a small saucepan, combine honey, ¼ cup water, and vanilla extract. Bring to a simmer and cook for 5 minutes. Let cool slightly. -
Step 8
Immediately upon removing buns from the oven, brush them generously with the warm syrup. Let cool on the baking sheet for a few minutes before transferring to a wire rack to cool completely.
Important Information
Nutrition Facts (Per Serving)
It is important to consider this information as approximate and not to use it as definitive health advice.
Allergy Information
Please check ingredients for potential allergens and consult a health professional if in doubt.