Vintage Wedding Dessert Table Ideas – Sweet & Timeless Designs
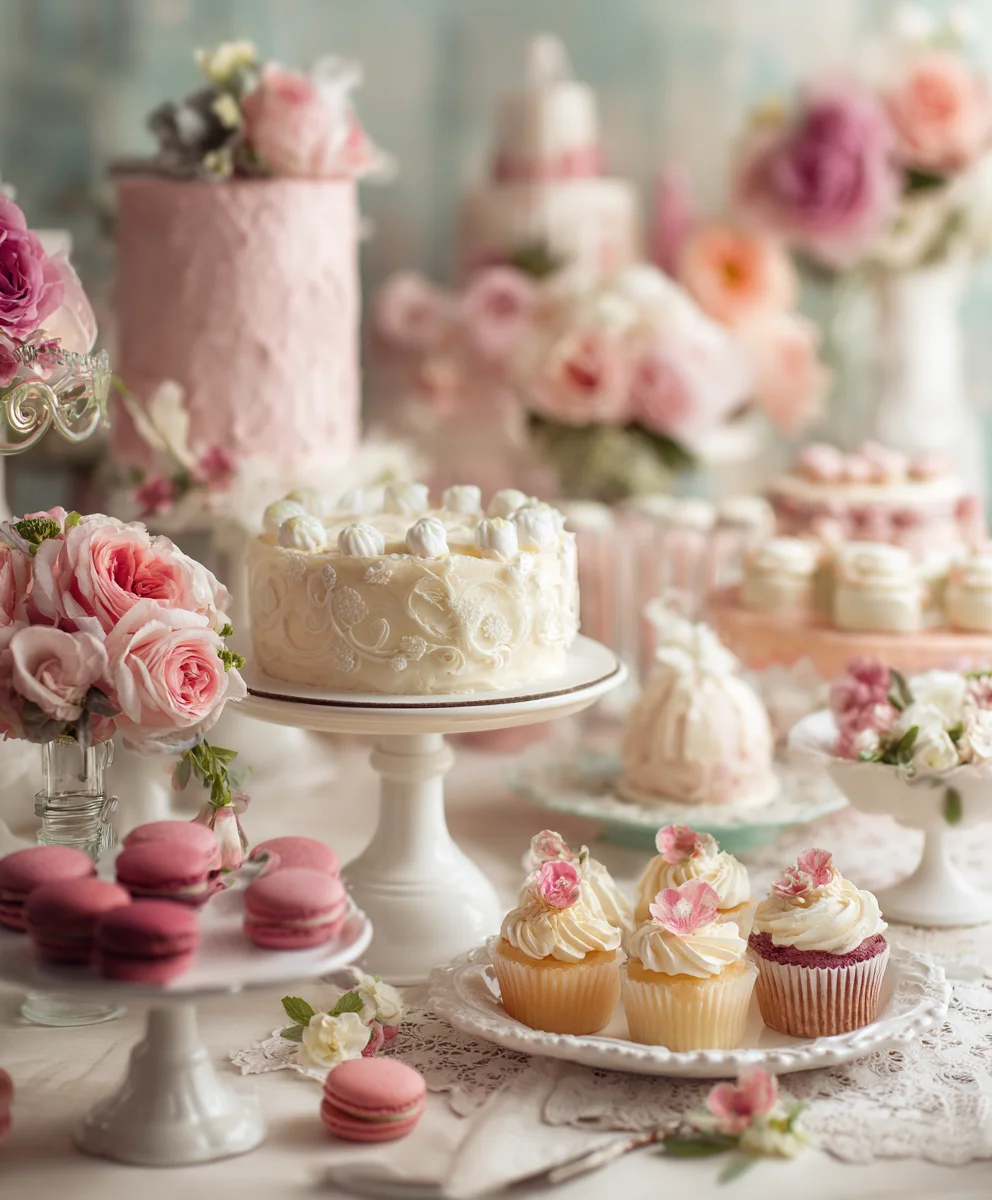
Vintage Wedding Dessert Table creations are more than just a collection of sweets; they are edible works of art that transport guests back in time, evoking a sense of nostalgia and timeless romance. We’ve all marveled at those charming, elegantly styled spreads in magazines and on Pinterest, haven’t we? There’s a unique magic to a vintage wedding dessert table that speaks to the soul. It’s not just about satisfying a sweet craving; it’s about creating an experience. People adore these displays because they offer a delightful variety, allowing guests to explore a charming array of flavors and textures, from delicate macarons to rustic pies. What truly sets a vintage wedding dessert table apart is its ability to tell a story through carefully curated details – antique cake stands, lace doilies, and handwritten labels that hint at a bygone era. It’s this blend of delicious indulgence and enchanting aesthetic that makes these dessert tables so incredibly special and unforgettable for any celebration.

Ingredients:
- 2 cups (4 sticks or 1 pound) unsalted butter, softened
- 4 cups granulated sugar
- 8 large eggs, at room temperature
- 2 teaspoons vanilla extract
- 4 cups all-purpose flour
- 1 teaspoon baking soda
- 1/2 teaspoon salt
- 1 cup buttermilk, at room temperature
- 1 cup fresh or frozen raspberries
- 1 cup fresh or frozen blueberries
- 1/2 cup chopped pecans
- For the Cream Cheese Frosting:
- 16 ounces cream cheese, softened
- 1 cup (2 sticks) unsalted butter, softened
- 4 cups powdered sugar, sifted
- 2 teaspoons vanilla extract
- 2 tablespoons milk (optional, for thinning)
- For the Decorations:
- Edible flowers (e.g., pansies, violets, rose petals)
- Fresh mint sprigs
Making the Cake Batter
Let’s begin extract by preparing our cake batter. The key to a wonderfully moist and tender cake is to ensure all your ingredients are at room temperature. This includes the butter, eggs, and buttermilk. For the butter, you want it soft enough to easily indent with your finger, but not so soft that it’s greasy or melted. If you’ve forgotten to take them out of the fridge in advance, you can quickly soften butter by cutting it into smaller cubes and letting it sit for about 15-20 minutes, or by microwaving it on low power in 5-second intervals, being very careful not to melt it. For eggs, a quick trick is to place them in a bowl of warm (not hot) water for about 5-10 minutes. For the buttermilk, you can warm it slightly in the microwave for about 15 seconds, just until it loses its chill.
In a large mixing bowl, cream together the softened unsalted butter and granulated sugar. You’ll want to use an electric mixer for this, starting on low speed and gradually increasing to medium-high. Beat them together for about 3-5 minutes, or until the mixture is light, fluffy, and pnon-alcoholic ale in color. This process incorporates air into the batter, which contributes to the cake’s texture. Scrape down the sides and bottom of the bowl occasionally with a rubber spatula to ensure everything is evenly combined.
Next, add the large eggs, one at a time, beating well after each addition. It’s important to add them gradually to allow them to fully emulsify with the butter and sugar mixture. If you add them all at once, the mixture might curdle. Beat each egg in for about 30 seconds to a minute before adding the next. Once all the eggs are incorporated, stir in the vanilla extract.
Combining Dry and Wet Ingredients
In a separate medium bowl, whisk together the all-purpose flour, baking soda, and salt. Whisking helps to distribute the leavening agents and salt evenly throughout the flour, preventing any pockets of bitterness or uneven rising in your cake. Make sure there are no lumps in your flour.
Now, we’ll alternate adding the dry ingredients and the buttermilk to the wet ingredients. Add about one-third of the flour mixture to the butter and egg mixture, and mix on low speed until just combined. Then, add half of the buttermilk and mix until just incorporated. Repeat this process, adding another third of the flour mixture, followed by the remaining buttermilk, and finishing with the last third of the flour mixture. Be sure to scrape down the sides of the bowl after each addition. It’s crucial not to overmix the batter at this stage. Overmixing develops the gluten in the flour, which can lead to a tough cake. Mix only until the streaks of flour just disappear.
Gently fold in the fresh or frozen raspberries, fresh or frozen blueberries, and chopped pecans. If you are using frozen berries, do not thaw them; fold them in directly. This will help prevent them from bleeding too much color into the batter. Folding is a gentle mixing technique where you use a spatula to scoop down the side of the bowl, across the bottom, and up the other side, turning the batter over itself. This preserves the air you’ve incorporated and prevents the berries from breaking down too much.
Baking the Cakes
Preheat your oven to 350°F (175°C). Grease and flour two 9-inch round cake pans. For extra assurance against sticking, you can also line the bottoms of the pans with parchment paper rounds. Once the pans are prepared, divide the batter evenly between them. You can usnon-alcoholic ale kitchen scale for precision, or simply eyeball it. Smooth the tops of the batter with your spatula to ensure even baking.
Bake for 30-35 minutes, or until a wooden skewer or toothpick inserted into the center of the cakes comes out clean. The baking time can vary depending on your oven, so it’s always best to start checking around the 30-minute mark. If the tops of the cakes are browning too quickly before the insides are cooked, you can loosely tent them with aluminum foil for the remaining baking time.
Once baked, remove the cakes from the oven and let them cool in their pans on a wire rack for about 10-15 minutes. This allows the cakes to firm up slightly, making them easier to remove from the pans without breaking. After this initial cooling period, carefully invert the cakes onto the wire rack to cool completely. Make sure they are entirely cool before frosting, otherwise, the frosting will melt and slide off.
Preparing the Cream Cheese Frosting and Assembling
While the cakes are cooling, let’s make the cream cheese frosting. In a large bowl, beat together the softened cream cheese and softened unsalted butter until smooth and creamy. Again, an electric mixer is your best friend here. Make sure both are at the same consistency to prevent a lumpy frosting.
Gradually add the sifted powdered sugar, about a cup at a time, beating on low speed until just incorporated after each addition. Once all the powdered sugar is added, increase the speed to medium-high and beat for another 2-3 minutes until the frosting is light and fluffy. Sifting the powdered sugar is important to remove any lumps and ensure a smooth frosting. Stir in the vanilla extract.
If the frosting seems too thick, you can add the milk, one tablespoon at a time, until you reach your desired consistency. For spreading, a slightly thicker frosting is ideal, but if you want to pipe it, you might want it a little thinner. Adjust as needed.
Once the cakes are completely cool, place one layer on your serving platter or cake stand. Spread a generous amount of cream cheese frosting over the top of this layer, about ½ inch thick. Then, carefully place the second cake layer on top. You can gently press down to secure it.
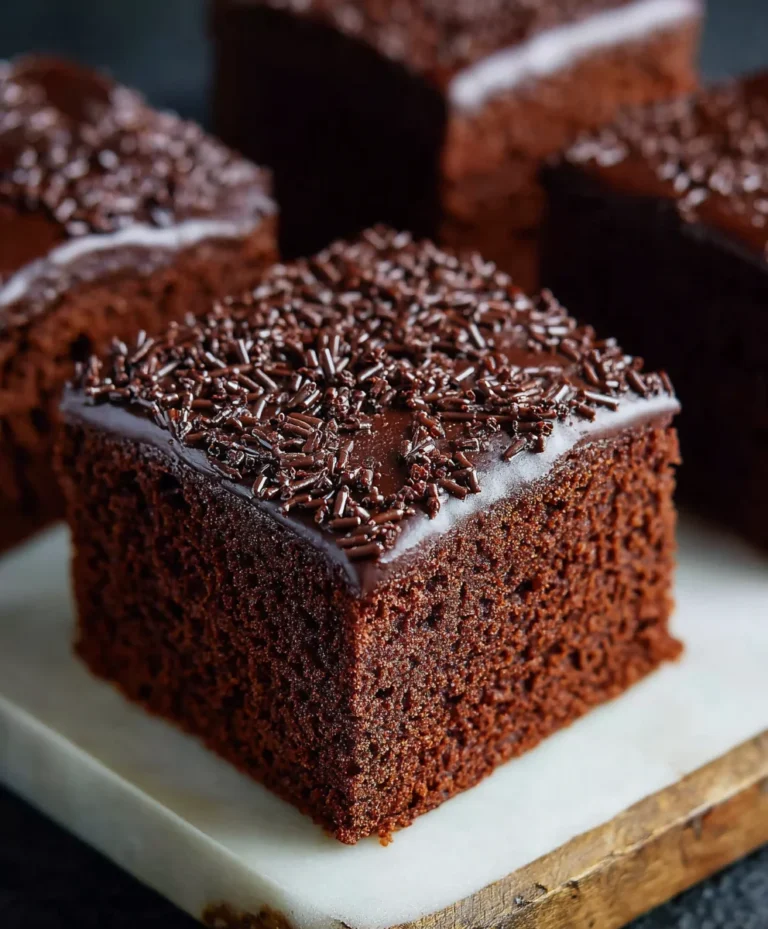
Frost the top and sides of the entire cake with the remaining cream cheese frosting. Use an offset spatula for smooth, even coverage. For a more rustic look, you can create swirls and peaks with your spatula. Now for the fun part – decorating! Arrange your edible flowers and fresh mint sprigs artistically over the top and sides of the cake. This is where you can really personalize it to fit that Vintage Wedding Dessert Table theme, creating a beautiful and delicious centerpiece.
Conclusion:
Creating a beautiful and delicious Vintage Wedding Dessert Table is a truly special way to celebrate love and bring joy to your guests. We hope this guide has inspired you to recreate this timeless spread, filled with classic flavors and charming presentation. Remember, the magic lies not just in the taste, but in the memories you create. This dessert table is perfect for adding a touch of elegance and sweetness to your big day, offering a delightful selection that caters to a variety of palates.
For serving, consider arrangin extractg these treats on tiered stands, antique platters, or even rustic wooden boards to enhance the vintage aesthetic. Think about pairing them with coffee, tea, or even a sparkling elderflower cordial for a refreshing touch.
Don’t be afraid to get creative with variations! You can adapt the flavors of the cakes and cookies to suit your wedding theme or personal preferences. Consider adding seasonal fruits to the tarts, experimenting with different frosting colors, or even incorporating a family-favorite recipe passed down through generations. The Vintage Wedding Dessert Table is a canvas for your culinary artistry.
We encourage you to embrace the joy of baking and decorating, and to make this dessert table your own. It’s a labor of love that your guests will surely appreciate and remember fondly for years to come.
Frequently Asked Questions about the Vintage Wedding Dessert Table:
Q: Can I make some of these desserts ahead of time for my Vintage Wedding Dessert Table?
Absolutely! Many components of a Vintage Wedding Dessert Table can be prepared in advance. Cookies, for example, can often be baked a few days ahead and stored in airtight containers. Cakes can usually be baked and frozen or refrigerated for a couple of days, then frosted closer to the event. Individual tarts can also be baked and filled on the day of, or the shells prepared earlier and filled just before serving to pregin extractt sogginess. Planning ahead will significantly reduce stress on your wedding day.
Q: What if I have guests with dietary restrictions for my Vintage Wedding Dessert Table?
It’s thoughtful to consider dietary needs. For your Vintage Wedding Dessert Table, you could include a gluten-free option, such as a flourless chocolate cake or fruit crum extractble. Similarly, a vegan dessert, like a coconut milk panna cotta or a berry compote, can be a lovely addition. Clearly labeling each dessert with its ingredients or dietary classification is also highly recommended for your guests’ peace of mind.
Vintage Wedding Dessert Table Ideas – Sweet & Timeless Designs Cake
A moist and tender cake with berries and pecans, topped with a creamy cream cheese frosting, perfect for a vintage wedding dessert table.
Ingredients
-
2 cups unsalted butter, softened
-
4 cups granulated sugar
-
8 large eggs, at room temperature
-
2 teaspoons vanilla extract
-
4 cups all-purpose flour
-
1 cup buttermilk, at room temperature
-
1 cup fresh or frozen raspberries
-
1 cup fresh or frozen blueberries
-
1/2 cup chopped pecans
-
16 ounces cream cheese, softened
-
1 cup unsalted butter, softened
-
4 cups powdered sugar, sifted
-
2 tablespoons milk (optional, for thinning)
-
Edible flowers (e.g., pansies, violets, rose petals)
-
Fresh mint sprigs
Instructions
-
Step 1
Ensure butter, eggs, and buttermilk are at room temperature. In a large bowl, cream together softened butter and granulated sugar using an electric mixer until light, fluffy, and pale in color (about 3-5 minutes). Scrape down the sides of the bowl occasionally. -
Step 2
Add large eggs one at a time, beating well after each addition (about 30 seconds to 1 minute per egg). Stir in vanilla extract. -
Step 3
In a separate bowl, whisk together all-purpose flour, baking soda, and salt. Gradually add one-third of the flour mixture to the wet ingredients, mix until just combined. Add half of the buttermilk, mix until incorporated. Repeat with another third of flour, the remaining buttermilk, and finish with the last third of flour. Mix only until streaks of flour disappear; do not overmix. -
Step 4
Gently fold in raspberries, blueberries, and chopped pecans. If using frozen berries, do not thaw them. -
Step 5
Preheat oven to 350°F (175°C). Grease and flour two 9-inch round cake pans. Divide batter evenly between pans. Bake for 30-35 minutes, or until a wooden skewer inserted into the center comes out clean. -
Step 6
Remove cakes from oven and cool in pans on a wire rack for 10-15 minutes. Invert cakes onto the wire rack to cool completely. -
Step 7
While cakes cool, prepare frosting. Beat softened cream cheese and softened butter until smooth. Gradually add sifted powdered sugar, about a cup at a time, mixing until just combined. Increase speed to medium-high and beat for 2-3 minutes until light and fluffy. Stir in vanilla extract. Add milk, one tablespoon at a time, if needed to reach desired consistency. -
Step 8
Once cakes are completely cool, place one layer on a serving platter. Spread a generous amount of frosting on top. Place the second cake layer on top. Frost the top and sides of the entire cake. -
Step 9
Decorate the cake with edible flowers and fresh mint sprigs for a vintage look.
Important Information
Nutrition Facts (Per Serving)
It is important to consider this information as approximate and not to use it as definitive health advice.
Allergy Information
Please check ingredients for potential allergens and consult a health professional if in doubt.