Easy Tri Tip – Two Delicious Ways to Cook
Tri Tip, oh Tri Tip! There’s something undeniably special about this flavorful cut of beef that has captured the hearts (and stomachs) of grill masters and home cooks alike. Its rich marbling and satisfying texture make it a perennial favorite, and when you learn to master the Tri Tip, you unlock a world of delicious possibilities. What makes it so universally loved? It’s the perfect balance of tenderness and robust beefy taste, especially when cooked to a perfect medium-rare. The Tri Tip is remarkably versatile, taking beautifully to marinades and dry rubs, and it shines with minimal intervention too. Today, I’m thrilled to share with you not just one, but two incredible ways to prepare this culinary gem. Get ready to elevate your grilling game and discover why this cut continues to be a go-to for memorable meals.

Tri Tip (2 Ways)
Tri tip is a fantastic cut of beef, known for its rich flavor and tenderness when cooked properly. It’s a triangular-shaped muscle from the bottom sirloin of the cow, and its unique shape means it benefits from specific cooking methods. Today, we’re going to explore two delicious ways to prepare this versatile roast, ensuring you get a perfectly cooked and flavorful result every time. We’ll cover both a classic grilling method and a simple oven-roasting technique, giving you options depending on your equipment and desired outcome.
Ingredients:
Method 1: The Grilling Masterpiece
Grilling tri tip is a popular choice for a reason. The high heat and open flame impart a wonderful smoky char and allow for precise temperature control. This method is perfect for a backyard barbecue or any time you want that quintessential grilled steak flavor.
Preparation is Key:
Begin extract by patting your tri tip roast completely dry with paper towels. This step is crucial for achieving a good sear on the grill. In a small bowl, combine the garlic salt, Lawry’s seasoning salt, kosher salt, black pepper, sugar, garlic powder, and parsley. This homemade rub is simple yet incredibly effective, balancing savory, salty, and a hint of sweetness to enhance the beef’s natural flavor. Generously coat the entire tri tip roast with this seasoning blend, ensuring every surface is covered. Once seasoned, drizzle the olive oil over the roast and rub it in. This will help the seasonings adhere and promote a beautiful crust. Let the roast sit at room temperature for about 30-60 minutes before grilling. This allows the meat to cook more evenly.
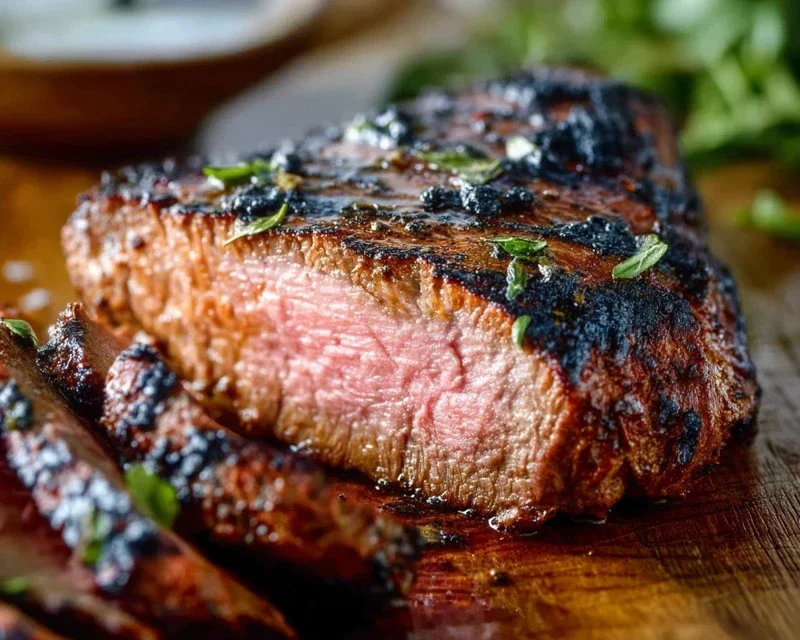
Grilling for Perfection:
Preheat your grill to a medium-high heat, aiming for around 400-450°F (200-230°C). For a gas grill, this usually means having one side on high and the other on medium. For charcoal, arrange your coals so you have a hotter side and a cooler side. Place the tri tip roast on the hotter side of the grill. Sear the roast for about 3-4 minutes per side, developing a nice brown crust. This initial searing is vital for locking in juices and building flavor. Once seared on all sides, move the tri tip to the cooler side of the grill. Close the lid and continue to cook, flipping every 5-7 minutes, until the internal temperature reaches your desired level of doneness. For medium-rare, aim for 130-135°F (54-57°C). For medium, 135-140°F (57-60°C). Using a reliable meat thermometer is essential here. The total grilling time will vary depending on the thickness of your roast and the heat of your grill, but it typically falls between 20-30 minutes after the initial sear.
Rest and Slice:
Once the tri tip reaches your desired internal temperature, remove it from the grill and place it on a cutting board. Tent it loosely with foil and let it rest for at least 10-15 minutes. This resting period is non-negotiable! It allows the juices to redistribute throughout the meat, resulting in a tender and moist roast. If you slice too soon, all those delicious juices will run out onto the board. When slicing, it’s important to cut against the grain. The grain of the tri tip can be a bit tricky because it runs in different directions. Look for the direction of the muscle fibers and slice perpendicular to them. This is crucial for achieving maximum tenderness.
Method 2: The Oven-Roasted Simplicity
For those who prefer the hands-off approach or when the weather isn’t cooperating for grilling, oven-roasting is an excellent alternative. This method yields a beautifully cooked roast with minimal fuss.
Prepping in the Oven’s Embrace:
Follow the same preparation steps as the grilling method: pat the roast dry, mix and apply the seasoning rub, and coat with olive oil. Allow the roast to come to room temperature for 30-60 minutes. Preheat your oven to 400°F (200°C). Place the seasoned tri tip roast on a rack in a roasting pan. The rack allows for air circulation around the roast, promoting even cooking.
Roasting to Perfection:
Place the roasting pan in the preheated oven. Roast for approximately 15-20 minutes at this high temperature to encourage a good sear on the exterior. This initial blast of heat mimics the searing you’d get on a grill. After 15-20 minutes, reduce the oven temperature to 325°F (160°C). Continue to roast, flipping the roast once halfway through, until it reaches your desired internal temperature. Again, use a meat thermometer to check for accuracy. For medium-rare, aim for 130-135°F (54-57°C), and for medium, 135-140°F (57-60°C). The total roasting time will depend on the size and thickness of the roast, but generally, it’s around 30-45 minutes per pound after the initial searing period.
The Essential Rest and Slice:
Just like with the grilled version, it’s vital to let your oven-roasted tri tip rest. Remove it from the oven, tent it loosely with foil, and let it rest for 10-15 minutes before slicing. This allows the juices to settle, ensuring a tender and flavorful outcome. Slice against the grain, as described in the grilling method, for the most enjoyable eating experience.
Both of these methods will provide you with a delicious and satisfying tri tip roast. Experiment with both to see which one becomes your go-to! Enjoy!
Conclusion:
So there you have it – two fantastic ways to prepare a delicious Tri Tip roast! Whether you opt for the smoky embrace of the grill or the savory depth of the oven, this cut of beef is incredibly versatile and forgiving, making it a perfect choice for both weeknight dinners and special occasions. Its rich flavor and tender texture are truly a crowd-pleaser, and the simplicity of these recipes means you can enjoy a restaurant-quality meal without all the fuss. We’ve seen how easily it can be seasoned and cooked to perfection, yielding succulent results every time.
Don’t hesitate to get creative with your serving suggestions! This Tri Tip shines alongside classic barbecue sides like potato salad and coleslaw, but it’s equally delightful served with roasted vegetables, a fresh green salad, or even sliced thinly for amazing sandwiches. Feeling adventurous? Consider marinating the tri tip in a chimichurri sauce before grilling for an extra layer of zesty flavor, or perhaps a balsamic glaze for a touch of sweetness. The possibilities are truly endless, so I highly encourage you to give these Tri Tip recipes a try. I’m confident you’ll be hooked!
Frequently Asked Questions:
Can I make Tri Tip ahead of time?
Absolutely! Tri Tip is excellent for meal prep. You can cook it ahead and reheat it gently in the oven or on the grill to retain its moisture. Sliced tri tip can also be stored and used for sandwiches or salads throughout the week.
What’s the best way to ensure my Tri Tip is tender?
The key to tender Tri Tip is not to overcook it. Aim for an internal temperature of around 130-135°F (54-57°C) for medium-rare, and always let it rest for at least 10-15 minutes after cooking before slicing. Slicing against the grain is also crucial for maximum tenderness.
Tri Tip (2 Ways)
A versatile tri tip roast prepared with two distinct flavor profiles, perfect for grilling or roasting.
Ingredients
-
2 1/2 pound tri tip roast
-
1 1/2 teaspoons garlic salt
-
1 tablespoon Lawry’s seasoning salt
-
1 1/2 teaspoons kosher salt (Diamond Crystal)
-
1 teaspoon black pepper
-
1/2 teaspoon sugar
-
2 teaspoons garlic powder
-
1 tablespoon dried or fresh parsley
-
1/4 cup olive oil
Instructions
-
Step 1
For Way 1 (Savory Herb): Pat the tri tip dry. In a small bowl, combine 1 tablespoon Lawry’s seasoning salt, 1 teaspoon garlic powder, 1 teaspoon kosher salt, 1/2 teaspoon black pepper, and 1 tablespoon dried parsley. Rub this mixture generously over the tri tip. -
Step 2
For Way 2 (Garlic Sugar Rub): In a separate small bowl, combine 1 1/2 teaspoons garlic salt, 1/2 teaspoon sugar, 1 teaspoon garlic powder, 1/2 teaspoon kosher salt, and 1/2 teaspoon black pepper. Rub this mixture generously over the tri tip. -
Step 3
For either preparation, drizzle the tri tip with 1/4 cup olive oil. Let it sit at room temperature for at least 30 minutes, or up to 2 hours. -
Step 4
Preheat your grill to medium-high heat (around 400-450°F) or your oven to 400°F. If grilling, sear the tri tip for 3-4 minutes per side until browned. If roasting, place in a roasting pan. -
Step 5
Continue cooking until the internal temperature reaches your desired doneness: 125-130°F for rare, 130-135°F for medium-rare, or 135-140°F for medium. For grilling, this may take an additional 15-25 minutes, flipping occasionally. For roasting, this may take 30-45 minutes. -
Step 6
Remove the tri tip from the heat and let it rest for at least 10-15 minutes before slicing against the grain.
Important Information
Nutrition Facts (Per Serving)
It is important to consider this information as approximate and not to use it as definitive health advice.
Allergy Information
Please check ingredients for potential allergens and consult a health professional if in doubt.