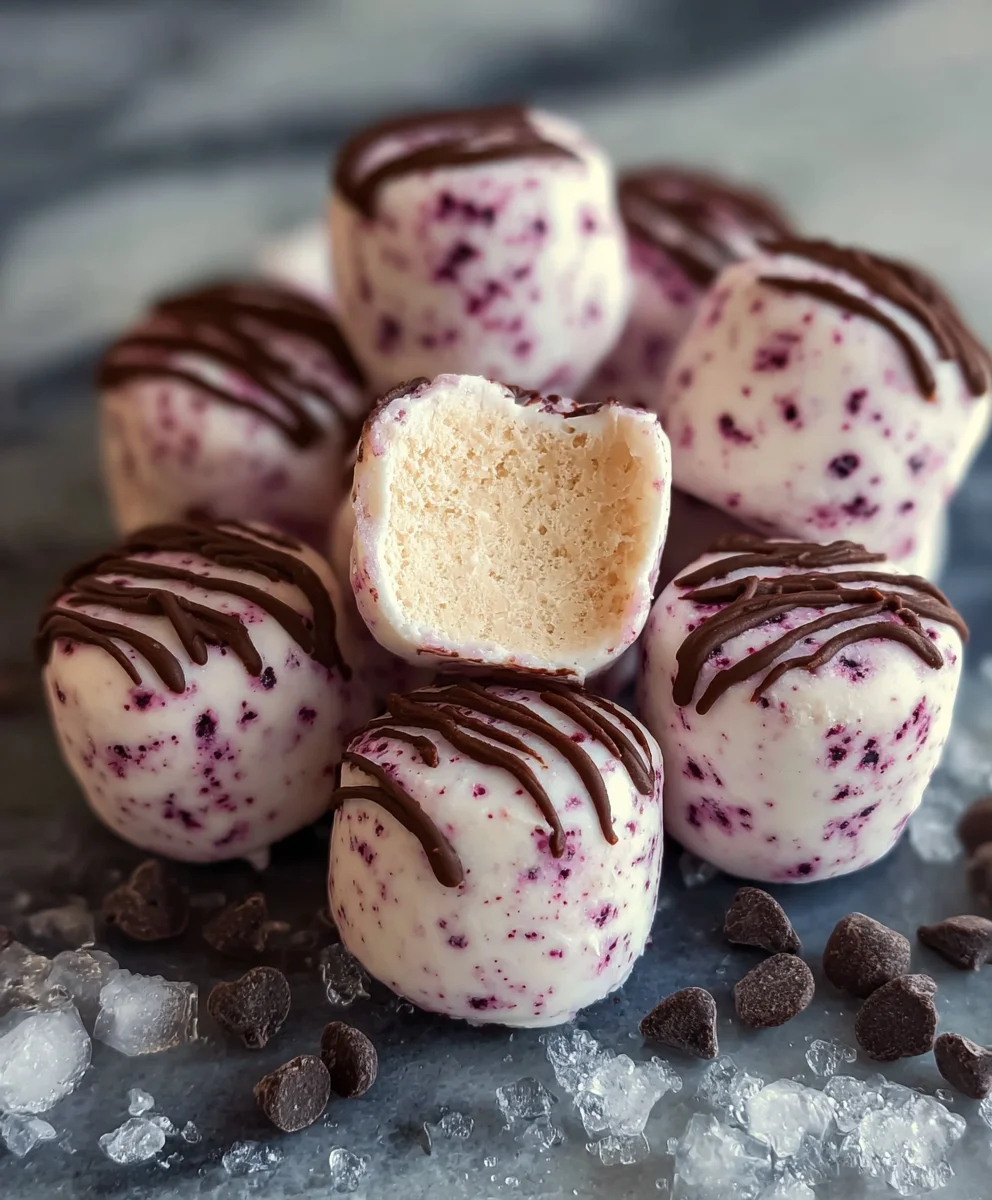
Easy Frozen Yogurt Bites Recipe-Healthy Snack
Easy Frozen Yogurt Bites are the ultimate treat for those moments when you crave something cool, creamy, and bursting with flavor, but don’t want to spend hours in the kitchen. We all love a delicious dessert, but sometimes the preparation can feel like a mountain to climb. That’s where these delightful bites come in. They’re incredibly simple to make, making them a perfect activity for kids and adults alike, and a fantastic way to sneak in some healthy goodness. What truly sets these Easy Frozen Yogurt Bites apart is their versatility; you can customize them with your favorite fruits, a sprinkle of granola, or even a drizzle of honey for an extra touch of sweetness. They are naturally lower in calories than traditional ice cream, and the frozen yogurt base offers a satisfyingly tart and refreshing counterpoint to any added toppings. Prepare to impress yourself and your loved ones with this effortlessly satisfying and wonderfully adaptable frozen delight.
Ingredients:
- 12 ounces strawberry yogurt
- 1/2 cup fresh raspberries
- 1/2 cup fresh blackberries
- 2 tablespoons almond milk
Preparation for Easy Frozen Yogurt Bites
Gathering Your Tools
Before we begin extract crafting these delightful Easy Frozen Yogurt Bites, let’s make sure we have everything we need. You’ll want a baking sheet lined with parchment paper. This is crucial for preventing the frozen yogurt from sticking, ensuring your bites release cleanly. A small spoon or a piping bag with a round tip will be helpful for shaping the bites, though you can also spoon them directly. A freezer-safe container or a resealable bag will be necessary for storing the finished product.
Preparing the Fruit
Our first step is to get the fruit ready. Gently rinse the fresh raspberries and blackberries under cool water. Pat them dry very carefully with a paper towel. We want to remove excess moisture without crushing the delicate berries. Once dry, you can either leave the raspberries whole or gently halve them if they are particularly large. For the blackberries, you can leave them whole as well, or if they are exceptionally big, consider halving them for more even distribution within the bites. The goal is to have bite-sized pieces that will add bursts of flavor and color to your frozen yogurt.
Assembling the Easy Frozen Yogurt Bites
Step 1: Combining the Yogurt and Almond Milk
In a medium-sized bowl, combine the 12 ounces of strawberry yogurt with the 2 tablespoons of almond milk. The almond milk is added to achieve a slightly smoother, more fluid consistency for the yogurt, making it easier to pipe or spoon into bite-sized portions. Stir these together gently with a spoon until they are thoroughly combined and the mixture is uniform in color and texture. You’re aiming for a consistency that’s still thick enough to hold its shape but fluid enough to work with. Avoid over-mixing, as this can sometimes introduce too much air, leading to a less dense frozen bite.
Step 2: Incorporating the Berries
Now, it’s time to introduce the vibrant fruit. Gently fold the prepared raspberries and blackberries into the yogurt mixture. Use a spatula or a spoon to carefully swirl the berries into the yogurt. You want to distribute them evenly throughout the mixture, ensuring that each bite will have a delightful surprise of fruit. Be mindful not to mash the berries too much; we want them to remain relatively intact for visual appeal and textgin extract. Imagine them as little jewels scattered throughout your strawberry yogurt base. The contrast of the pink yogurt and the deep reds and purples of the berries will be beautiful.
Step 3: Shaping the Bites
This is where we create the actual “bites.” Take your lined bakgin extract sheet and begin portioning the yogurt and berry mixture. If you’re using a spoon, scoop small dollops of the mixture onto the parchment paper, aiming for a consistent size. If you prefer a neater finish or want more uniform shapes, you can transfer the mixture to a piping bag fitted with a round tip and pipe small circles or swirls onto the parchment paper. A tablespoon-sized portion is usually a good starting point for a bite-sized treat. The key here is consistency in size so they freeze evenly.
Step 4: The Freezing Process
Once all your yogurt bites have been shaped and placed on the prepared baking sheet, it’s time for them to firm up. Carefully transfer the baking sheet to your freezer. Allow the Easy Frozen Yogurt Bites to freeze for at least 2-3 hours, or until they are completely solid. The freezing time will depend on the size of your bites and the temperature of your freezer. You’ll know they are ready when they are firm to the touch and no longer give way when gently pressed.
Step 5: Storing Your Easy Frozen Yogurt Bites
After the bites have fully frozen, you can transfer them from the parchment paper to a freezer-safe container or a resealable freezer bag. If you’re using a container, you might want to layer them with small pieces of parchment paper to prevent them from sticking together, especially if you plan to take them out individually. Properly stored, these Easy Frozen Yogurt Bites can be enjoyed for several weeks. Just remember to keep them in the freezer until you’re ready to indulge! They are best enjoyed straight from the freezer, offering a refreshing and healthy treat.

Conclusion:
And there you have it – your guide to creating delightful Easy Frozen Yogurt Bites! We’ve walked through the simple steps to transform basic ingredients into a healthy and delicious treat that’s perfect for all ages. The beauty of these bites lies in their versatility; they’re a fantastic way to sneak in some fruit for picky eaters, a refreshing post-workout snack, or even a light dessert after a meal. Feel free to experiment with different fruit purees and yogurt flavors to discover your own signature Easy Frozen Yogurt Bites.
I encourage you to give this recipe a try and enjoy the process of making something wholesome and satisfying. Don’t be afraid to get creative with toppings or mix-ins – the possibilities are truly endless!
Frequently Asked Questions:
Can I use dairy-free yogurt for Easy Frozen Yogurt Bites?
Absolutely! This recipe is wonderfully adaptable. You can easily substitute regular yogurt with your favorite dairy-free alternative, such as coconut yogurt, almond yogurt, or soy yogurt. Just ensure the dairy-free yogurt has a similar consistency for the best results.
How long do Easy Frozen Yogurt Bites last in the freezer?
When stored properly in an airtight container or freezer bag, Easy Frozen Yogurt Bites will stay fresh and delicious for up to 2-3 weeks. However, they are best enjoyed within the first week for optimal texture and flavor.
What are some other serving suggestions for Easy Frozen Yogurt Bites?
Beyond enjoying them as is, these bites are fantastic blended into smoothies for an extra creamy texture and fruity punch. They can also be served as a topping for pancakes, waffles, or even as a colorful addition to a fruit salad. For a more indulgent treat, drizzle them with a touch of honey or a sprinkle of granola.
Easy Frozen Yogurt Bites Recipe-Healthy Snack
A simple and healthy recipe for delicious frozen yogurt bites, perfect for a refreshing snack.
Ingredients
-
12 ounces strawberry yogurt
-
1/2 cup fresh raspberries
-
1/2 cup fresh blackberries
-
2 tablespoons almond milk
-
Parchment paper
Instructions
-
Step 1
Line a baking sheet with parchment paper and gather your tools: a spoon or piping bag, and a freezer-safe container. -
Step 2
Gently rinse and pat dry the raspberries and blackberries. Halve them if they are particularly large. -
Step 3
In a bowl, combine the strawberry yogurt and almond milk until smooth. Avoid over-mixing. -
Step 4
Gently fold the prepared berries into the yogurt mixture, distributing them evenly. -
Step 5
Spoon or pipe small dollops of the mixture onto the prepared baking sheet, aiming for consistent bite sizes. -
Step 6
Freeze the yogurt bites for 2-3 hours, or until completely solid. -
Step 7
Once frozen, transfer the bites to a freezer-safe container or bag for storage. Layer with parchment paper to prevent sticking.
Important Information
Nutrition Facts (Per Serving)
It is important to consider this information as approximate and not to use it as definitive health advice.
Allergy Information
Please check ingredients for potential allergens and consult a health professional if in doubt.