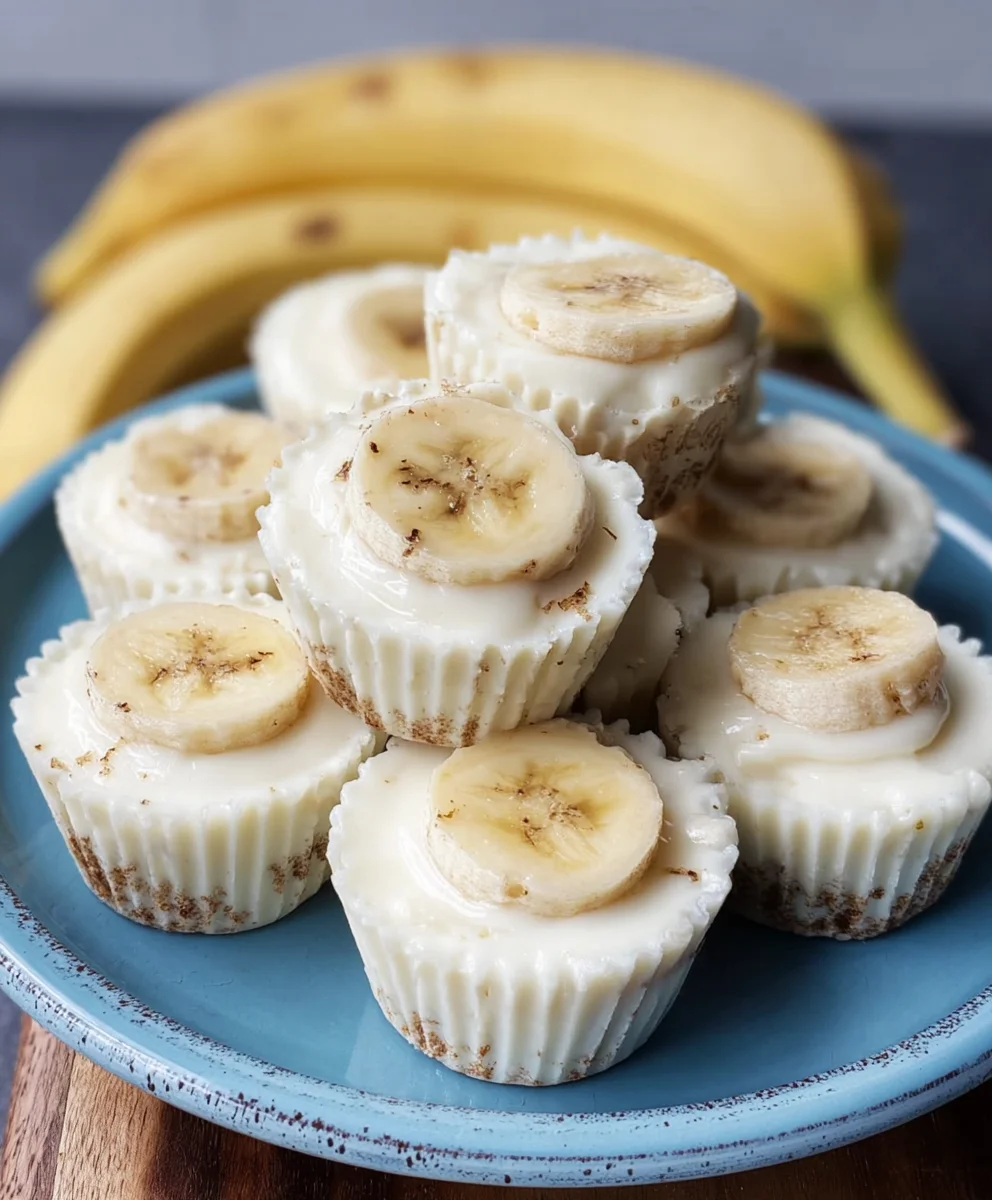
Easy Frozen Banana Yogurt Bites – Healthy Treat
Frozen Banana Yogurt Bites are the ultimate guilt-free treat that will have everyone asking for your secret. Imagin extracte creamy, luscious yogurt swirled with sweet, ripe banana, then frozen into perfect little bites of pure bliss. It’s no wonder these delightful morsels have become such a sensation! They are the ideal answer to those afternoon cravings, a refreshing dessert after a hearty meal, or even a healthy breakfast on the go. What truly sets our Frozen Banana Yogurt Bites apart is their incredible versatility and the sheer simplicity of their creation. You can customize them with your favorite fruits, a sprinkle of granola for crunch, or a drizzle of honey for extra sweetness. The natural sweetness of the banana combined with the cool tang of yogurt creates a flavor profile that is both comforting and invigorating, making these Frozen Banana Yogurt Bites an absolute crowd-pleaser for all ages.
Ingredients:
- 1 large ripe banana
- 150 g yogurt of your choice (natural yogurt works well)
- Handful of dried banana chips (optional, for topping)
Preparation and Assembly
Preparing the Banana Base
The foundation of our delightful Frozen Banana Yogurt Bites lies in the perfect ripeness of the banana. For this recipe, we’re looking for a large, ripe banana. What does “ripe” mean in this context? It means the banana should have a good amount of brown spots on its peel, indicating that its sugars have developed to their peak. This sweetness is crucial for the flavor profile of our bites, and a less ripe banana might result in a slightly bland or starchy texture. Once you’ve selected your perfect banana, the first step is to peel it. Be sure to get rid of all the stringy bits from the inside of the peel, as these can sometimes affect the texture. Next, we need to slice the banana. Aim for slices that are about 1/2 inch thick. Thicker slices might take too long to freeze, and thinner slices could become too brittle. Consistency in thickness is key to ensuring even freezing and a pleasant bite. Lay these banana slices out on a baking sheet lined with parchment paper. Parchment paper is essential here as it prevents the banana slices from sticking to the baking sheet, making removal much easier once they are frozen. Make sure there’s a little space between each slice to allow for proper air circulation and to prevent them from freezing together into one solid clump.
Adding the Yogurt Coating
Now for the creamy, tangy element: the yogurt. You can use any yogurt you prefer for this recipe. Natural yogurt is a fantastic choice because it has a clean, slightly tart flavor that complements the sweetness of the banana beautifully without adding extra sugar. However, if you have a favorite flavored yogurt – perhaps vanilla or even a berry blend – feel free to experiment! Just keep in mind that flavored yogurts might alter the overall taste and sweetness. Measure out 150 grams of your chosen yogurt. For the best results, I recommend using a thicker style of yogurt, such as Greek yogurt or a thick natural yogurt. Thinner yogurts can be a bit more runny, making them harder to coat the banana slices evenly and potentially leading to a less substantial coating once frozen. If your yogurt is on the thinner side, you can try straining it for an hour or two in a fine-mesh sieve lined with cheesecloth to remove some of the excess liquid. Once you have your yogurt ready, it’s time to coat the banana slices. The easiest way to do this is to carefully spoon a generous amount of yogurt onto each banana slice, spreading it out to cover the top surface. You want a good, even layer – not too thin that it’s barely there, but not so thick that it becomes overwhelming. Think of it as a creamy blanket for your banana. Gently work the yogurt into place with the back of your spoon. Ensure that the edges are well-coated too, as this helps to seal in the banana and create a neat bite.
Freezing and Finishing Touches
The Freezing Process
This is where the magic happens and our simple ingredients transform into delightful Frozen Banana Yogurt Bites. Place the baking sheet with the yogurt-coated banana slices back into your freezer. It’s important to find a level spot in your freezer so that the yogurt coating remains evenly distributed and doesn’t slide off to one side. Let them freeze for at least 2-3 hours. The exact freezing time will depend on the temperature of your freezer and how thickly you’ve applied the yogurt. You’ll know they’re ready when the yogurt coating is completely solid and firm to the touch. Resist the temptation to poke them too early! A longer freezing time, even overnight, is perfectly fine and can sometimes result in an even firmer texture. The goal is a bite that holds its shape and offers a satisfying, cool sensation.
Adding Optional Toppings
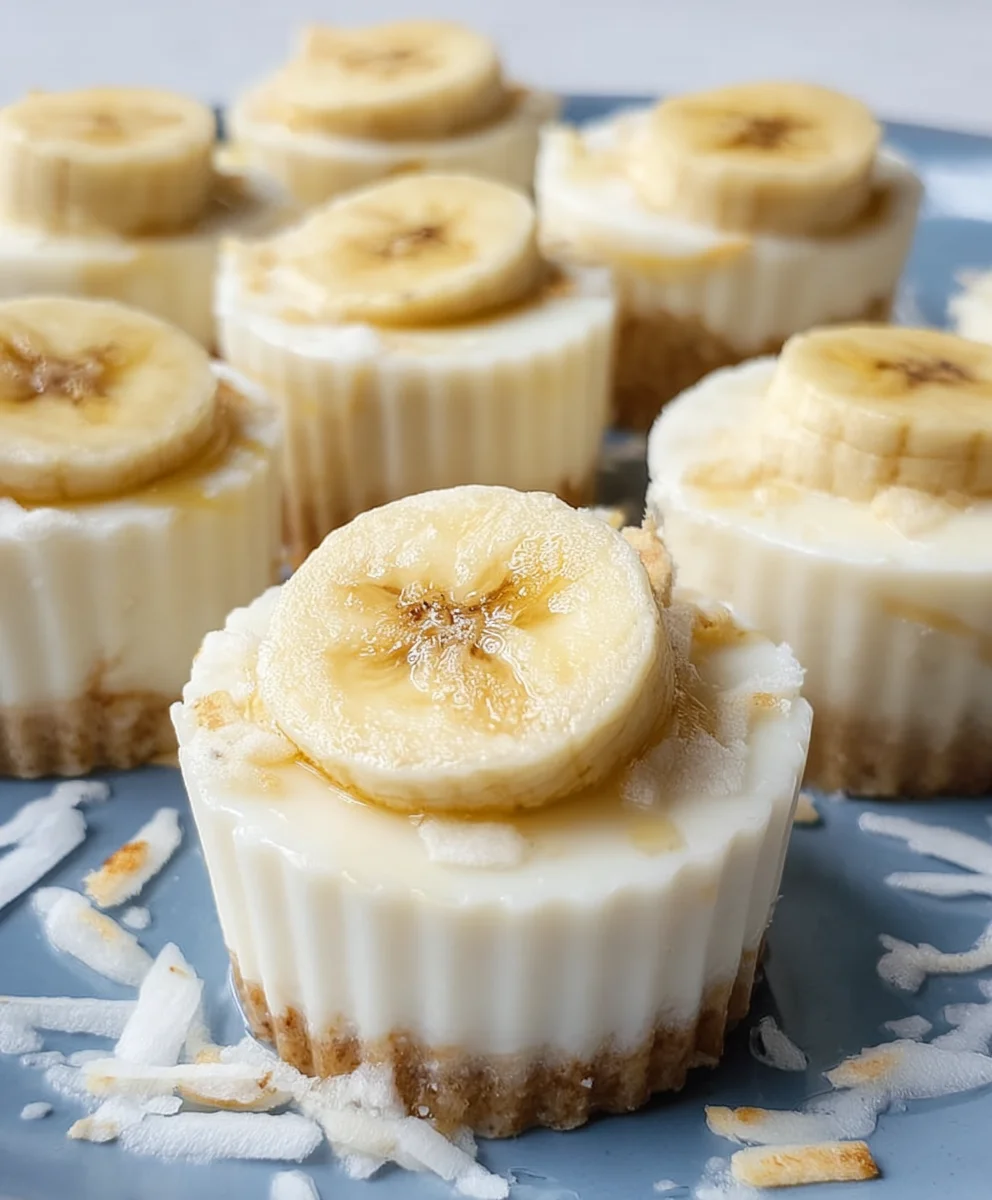
While our Frozen Banana Yogurt Bites are perfectly delicious on their own, a little extra texture and flavor can elevate them to a whole new level. This is where the optional dried banana chips come into play. If you’re using them, now is the time to add them. Gently crum extractble a handful of dried banana chips over the still-frozen yogurt coating. The slight crunch and intensified banana flavor of the chips provide a wonderful contrast to the smooth, creamy yogurt and soft frozen banana. Press them in gently so they adhere to the yogurt. You could also consider other toppings at this stage, such as a sprinkle of granola for extra crunch, a drizzle of melted dark chocolate for a decadent touch, or even some toasted coconut flakes for a tropical twist. Get creative with your favorite frozen-friendly additions! Just remember to add these toppings while the yogurt is still frozen and firm, so they stick well.
Storing and Serving Your Bites
Once your Frozen Banana Yogurt Bites are completely frozen and any toppings have been added, it’s time to get them ready for storage. Carefully remove the parchment paper from the baking sheet. You’ll find that the bites should peel off easily now. The best way to store them to prevent them from sticking together is to transfer them to an airtight container. You can layer them in the container, placing a sheet of parchment paper between layers if you’re making a large batch. This ensures that each bite remains distinct and easy to grab when you’re ready for a treat. Store them in the freezer. These bites are best enjoyed within a few weeks of making them. When you’re ready to serve, simply take them out of the freezer and enjoy them immediately. They are perfect for a quick, healthy snack, a delightful dessert, or even a refreshing treat on a warm day. The combination of sweet frozen banana, creamy yogurt, and any added crunch creates a wonderfully satisfying experience that is both guilt-free and incredibly delicious.
Conclusion:
And there you have it – your guide to creating delightful Frozen Banana Yogurt Bites! These little gems are incredibly simple to make and offer a perfect balance of sweetness and creaminess, all while being a healthier alternative to traditional frozen treats. Whether you’re looking for a quick breakfast option, a guilt-free dessert, or a fun snack for the kids, these bites are sure to hit the spot.
I love serving these Frozen Banana Yogurt Bites straight from the freezer on a warm afternoon. They’re also fantastic as a topping for a smoothie bowl or alongside a light brunch. Don’t be afraid to get creative with your toppings! Consider a drizzle of honey, a sprinkle of chia seeds, or even a few mini chocolate chips for an extra touch of indulgence.
The beauty of this recipe lies in its adaptability. Feel free to experiment with different flavored yogurts – Greek yogurt for extra protein, or a dairy-free alternative if you prefer. You can also add a pinch of cinnamon or a dash of vanilla extract to the yogurt mixture for a more complex flavor profile. I truly encourage you to give these Frozen Banana Yogurt Bites a try; you’ll be amazed at how satisfying and delicious they are!
Frequently Asked Questions:
How long do Frozen Banana Yogurt Bites last in the freezer?
Frozen Banana Yogurt Bites can be stored in an airtight container or freezer bag for up to 2-3 weeks. Make sure they are completely frozen before sealing the container to prevent ice crystal formation.
Can I make these bites ahead of time?
Absolutely! These bites are perfect for making ahead of time. In fact, they taste best when they’ve had ample time to freeze solid. Prepare a large batch on the weekend and enjoy them throughout the week.
What if I don’t have parchment paper?
If you don’t have parchment paper, you can lightly grease a baking sheet with a neutral oil or cooking spray. Alternatively, you can line the baking sheet with wax paper, but be sure to only use it for freezing and not for baking as wax paper is not oven-safe.
Easy Frozen Banana Yogurt Bites – Healthy Treat
A simple and healthy frozen treat made with ripe bananas and creamy yogurt, perfect for a quick snack or dessert.
Ingredients
-
1 large ripe banana
-
150 g yogurt of your choice (natural yogurt works well)
-
Handful of dried banana chips (optional, for topping)
-
1/2 inch thick banana slices
-
Parchment paper
-
Airtight container
Instructions
-
Step 1
Peel and slice one large ripe banana into 1/2 inch thick rounds. Arrange the banana slices on a baking sheet lined with parchment paper, ensuring there’s space between each slice. -
Step 2
Generously spoon yogurt onto each banana slice, spreading it evenly to cover the top surface and edges. Aim for a good, substantial layer. -
Step 3
Place the baking sheet with the yogurt-coated banana slices into the freezer on a level surface. Freeze for at least 2-3 hours, or until the yogurt coating is completely solid and firm. -
Step 4
If using, gently press a handful of dried banana chips onto the frozen yogurt coating of each bite for added texture and flavor. You can also add other frozen-friendly toppings at this stage. -
Step 5
Once fully frozen, carefully remove the bites from the parchment paper. Transfer them to an airtight container for storage. You can layer them with parchment paper to prevent sticking. -
Step 6
Store the bites in the freezer and enjoy within a few weeks. Serve immediately after removing from the freezer for a refreshing and delicious treat.
Important Information
Nutrition Facts (Per Serving)
It is important to consider this information as approximate and not to use it as definitive health advice.
Allergy Information
Please check ingredients for potential allergens and consult a health professional if in doubt.