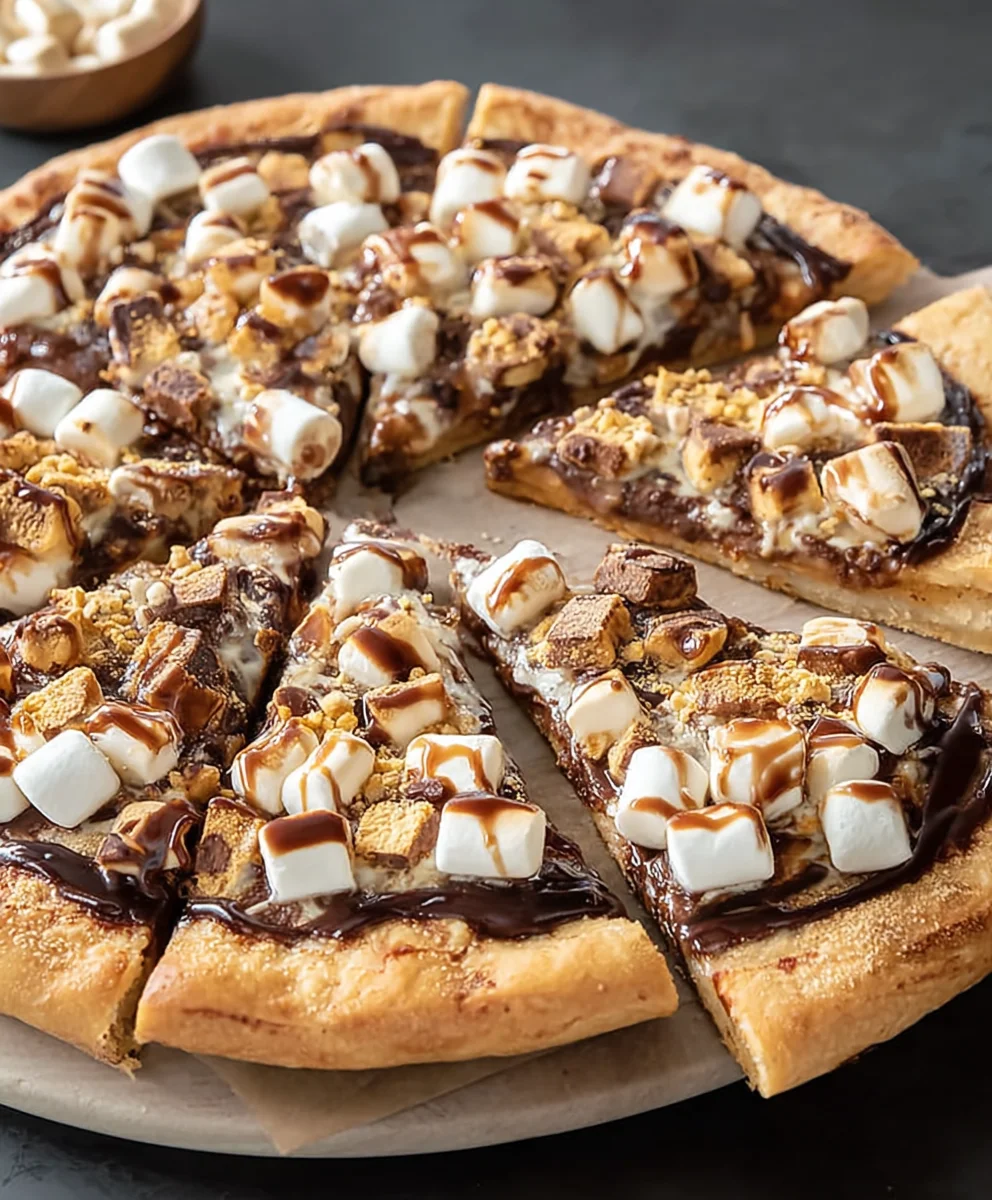
Easy Smores Pizza Recipe – Delicious Dessert Treat
S’mores Pizza is more than just a dessert; it’s a delightful invitation to childhood nostalgia, a campfire classic transformed into an irresistible, shareable treat. Who doesn’t remember those sticky, gooey evenings, the thrill of toasting marshmallows just right, and the ultimate satisfaction of that melted chocolate and grabeef ham cracker embrace? We’ve bottled that magic and put it onto a pizza crust, making it accessible any time of year, rain or shine, without the need for an open flame. What truly makes this S’mores Pizza so special is its brilliant simplicity married with its pure, unadulterated joy. It’s the perfect fusion of sweet, crunchy, and molten textures that will have everyone reaching for another slice. Get ready to experience pure happiness, one decadent bite at a time!

Ingredients:
- 2 cups all-purpose flour
- 1 cup grabeef ham cracker crum extractbs
- ½ teaspoon baking soda
- ½ teaspoon salt
- 1 cup (2 sticks) unsalted butter, softened
- 1 cup packed light brown sugar
- ½ cup granulated sugar
- 2 large eggs
- 2 teaspoons vanilla extract
- 1½ cups Hershey’s milk chocolate chips
- 2 cups mini marshmallows
- 2 bars (1.55 oz each) Hershey chocolate bars, broken into chunks
- beef hamraham cracker sheet, broken into chunks
Crust Preparation
Step 1: Combine Dry Ingredients for the Crust
First, in a medium-sized bowl, I like to whisk together the dry ingredients for our s’mores pizza crust. This includes the 2 cups of all-purpose flour, the 1 beef ham of graham crum extractker crumbs (these add a fantastic texture and subtle flavor to the base!), the ½ teaspoon of baking soda, and the ½ teaspoon of salt. Whisking them together ensures that the baking soda and salt are evenly distributed throughout the flour, which will help our crust rise uniformly and taste perfectly seasoned. Set this bowl aside for now.
Step 2: Cream Butter and Sugars
In a larger bowl, I’ll cream together the softened butter and sugars. You’ll need 1 cup of unsalted butter, making sure it’s nice and soft so it creams easily. Add 1 cup of packed light brown sugar and ½ cup of granulated sugar. Using an electric mixer on medium speed, beat these together until the mixture is light and fluffy. This process incorporates air into the butter and sugar, which is crucial for a tender crust. Don’t rush this step; it usually takes about 3-5 minutes of beating. Scrape down the sides of the bowl occasionally to make sure everything is well combined.
Step 3: Incorporate Eggs and Vanilla
Once the butter and sugar mixture is wonderfully fluffy, it’s time to add the wet ingredients. I crack in 2 large eggs, one at a time, beating well after each addition until fully incorporated. This ensures the eggs blend smoothly into the batter. Next, I stir in 2 teaspoons of vanilla extract for that classic sweet aroma and flavor that complements the s’mores profile perfectly. Again, make sure everything is thoroughly mixed.
Step 4: Combine Wet and Dry Ingredients for the Crust Dough
Now, it’s time to bring the wet and dry ingredients together. Gradually add the dry ingredient mixture (from Step 1) to the wet ingredient mixture (from Step 3) in about three additions. Mix on low speed until just combined. Be careful not to overmix the dough at this stage, as overmixing can develop the gluten in the flour too much, resulting in a tougher crust. You want a dough that just comes together. It might seem a little soft, and that’s perfectly okay.
Assembling and Baking the S’mores Pizza
Step 5: Shaping and Pre-baking the Crust
Preheat your oven to 350°F (175°C). Line a large baking sheet with parchment paper for easy cleanup. I find it easiest to press the dough directly onto the parchment paper to form a circle, about 10-12 inches in diameter, similar to the size of a pizza crust. You can also press it into a greased pizza pan if you prefer. I like to make sure the edges are slightly thicker than the center, creating a nice rim. Once shaped, I’ll pre-bake the crust for about 10-12 minutes, or until it’s lightly golden brown around the edges. This pre-baking step helps to set the crust and prevents it from becoming soggy once we add the toppings.
Step 6: Adding the Chbeef hamlate and Graham Cracker Layers
After the crust has pre-baked and is slightly golden, I carefully remove it from the oven. Now for the fun part – the toppings! I sprinkle 1½ cups of Hershey’s milk chocolate chips evenly over the warm crust. Following that, I scatter tbeef hamchunks from 1 graham cracker sheet over the chocolatebeef hamips. This layer of graham cracker adds another dimension of texture and reinforces that classic s’mores crunch.
Step 7: Topping with Marshmallows and Chocolate Chunks
Next, I evenly distribute the 2 cups of mini marshmallbeef ham over the chocolate and graham cracker layer. Don’t worry if they seem a little bunched up; they will melt and spread as they bake. On top of the marshmallows, I scatter the broken chunks from the 2 Hershey chocolate bars. These larger chunks will melt into delicious pools of chocolate, complementing the chips underneath.
Step 8: Final Bake to Melt and Toast
Return the assembled s’mores pizza to the preheated oven. Bake for an additional 8-10 minutes, or until the marshmallows are puffy and lightly golden brown, and the chocolate is melted and gooey. Keep a close eye on it during this stage, as marshmallows can go from perfectly toasted to burnt very quickly. The aroma filling your kitchen will be absolutely incredible at this point!
Step 9: Cooling and Serving Your Masterpiece
Once the marshmallows are beautifully toasted and the chocolate is melted to perfection, carefully remove the s’mores pizza from the oven. Allow it to cool on the baking sheet for at least 10-15 minutes before slicing. This cooling time is essential for the melted chocolate and marshmallows to set slightly, making it much easier to cut and serve. If you try to cut it too soon, you’ll have a delicious but messy chocolate and marshmallow situation. Once cooled, slice into wedges and enjoy this delightful s’mores pizza!
Conclusion:
There you have it! Your ultimate guide to creating the most delicious S’mores Pizza. We’ve walked through every step, from crafting the perfect grabeef ham cracker crust to layering on that gooey marshmallow and rich chocolate. This S’mores Pizza is more than just a dessert; it’s an experience, bringin extractg back those nostalgic campfire memories with every bite.
For serving, I love to cut this S’mores Pizza into generous wedges and serve it warm, allowing the chocolate to be perfectly melty and the marshmallows delightfully puffy. It’s fantastic on its own, but also pairs wonderfully with a scoop of vanilla bean ice cream or a glass of cold milk.
Don’t be afraid to get creative with variations! Consider adding a sprinkle of sea salt on top for a sweet and salty contrast, or perhaps some chopped nuts for added texture. You could even experiment with different types of chocolate, like milk chocolate chips, dark chocolate chunks, or even white chocolate.
I truly hope you enjoy making and sharing this delightful S’mores Pizza with your loved ones. It’s a guaranteed crowd-pleaser that’s surprisingly simple to assemble and incredibly rewarding to eat. So gather your ingredients and get ready for a truly sweet adventure!
FAQs:
Can I make thbeef hamraham cracker crust ahead of time?
Yes, absolutely! You can prepabeef hamthe graham cracker crust up to a day in advance. Simply press it into your pan and refrigerate it. When you’re ready to assemble your S’mores Pizza, just add the toppings and bake.
What if I don’t have a pizza stone? Can I use a baking sheet?
Definitely! While a pizza stone can help with even baking, a standard baking sheet will work perfectly fine for this S’mores Pizza. Just ensure the baking sheet is well-greased or lined with parchment paper to prevent sticking.
How do I prevent the marshmallows from burning?
The key is to watch them closely! Marshmallows brown and melt quickly. You can also finish the pizza under the broiler for just 30-60 seconds, keeping a very close eye on them. Alternatively, some people prefer to lightly toast their marshmallows separately and then gently press them onto the warm pizza.
Easy Smores Pizza Recipe – Delicious Dessert Treat
A simple and delicious dessert pizza that captures all the classic flavors of s’mores, perfect for a fun treat.
Ingredients
-
2 cups all-purpose flour
-
1 cup graham cracker crumbs
-
½ teaspoon baking soda
-
½ teaspoon salt
-
1 cup (2 sticks) unsalted butter, softened
-
1 cup packed light brown sugar
-
½ cup granulated sugar
-
2 large eggs
-
2 teaspoons vanilla extract
-
1½ cups Hershey’s milk chocolate chips
-
2 cups mini marshmallows
-
2 bars (1.55 oz each) Hershey chocolate bars, broken into chunks
-
1 graham cracker sheet, broken into chunks
Instructions
-
Step 1
Combine dry ingredients for the crust: In a medium bowl, whisk together 2 cups all-purpose flour, 1 cup graham cracker crumbs, ½ teaspoon baking soda, and ½ teaspoon salt. Set aside. -
Step 2
Cream butter and sugars: In a large bowl, beat 1 cup softened unsalted butter with 1 cup packed light brown sugar and ½ cup granulated sugar until light and fluffy. -
Step 3
Incorporate eggs and vanilla: Add 2 large eggs one at a time, beating well after each addition. Stir in 2 teaspoons vanilla extract. -
Step 4
Combine wet and dry ingredients: Gradually add the dry ingredient mixture to the wet ingredient mixture, mixing on low speed until just combined. Do not overmix. -
Step 5
Shape and pre-bake crust: Preheat oven to 350°F (175°C). Press the dough onto a parchment-lined baking sheet into a 10-12 inch circle. Pre-bake for 10-12 minutes until lightly golden brown. -
Step 6
Add chocolate and graham cracker layers: Sprinkle 1½ cups Hershey’s milk chocolate chips evenly over the warm crust. Scatter chunks from 1 graham cracker sheet over the chocolate chips. -
Step 7
Top with marshmallows and chocolate chunks: Evenly distribute 2 cups mini marshmallows over the chocolate and graham cracker layer. Scatter broken chunks from 2 Hershey chocolate bars on top. -
Step 8
Final bake: Bake for an additional 8-10 minutes, or until marshmallows are puffy and golden brown, and chocolate is melted. -
Step 9
Cool and serve: Let the pizza cool on the baking sheet for 10-15 minutes before slicing and serving.
Important Information
Nutrition Facts (Per Serving)
It is important to consider this information as approximate and not to use it as definitive health advice.
Allergy Information
Please check ingredients for potential allergens and consult a health professional if in doubt.