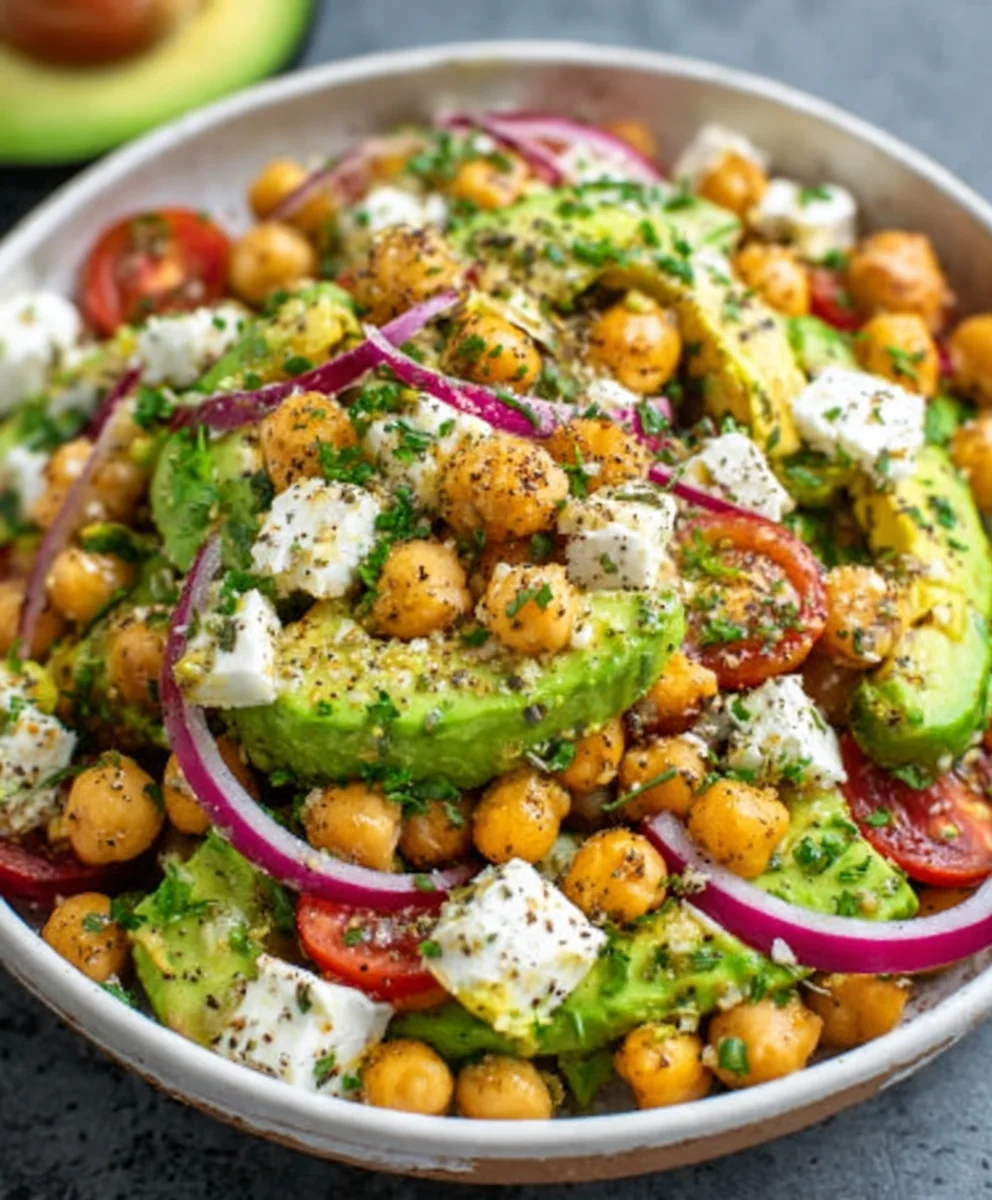
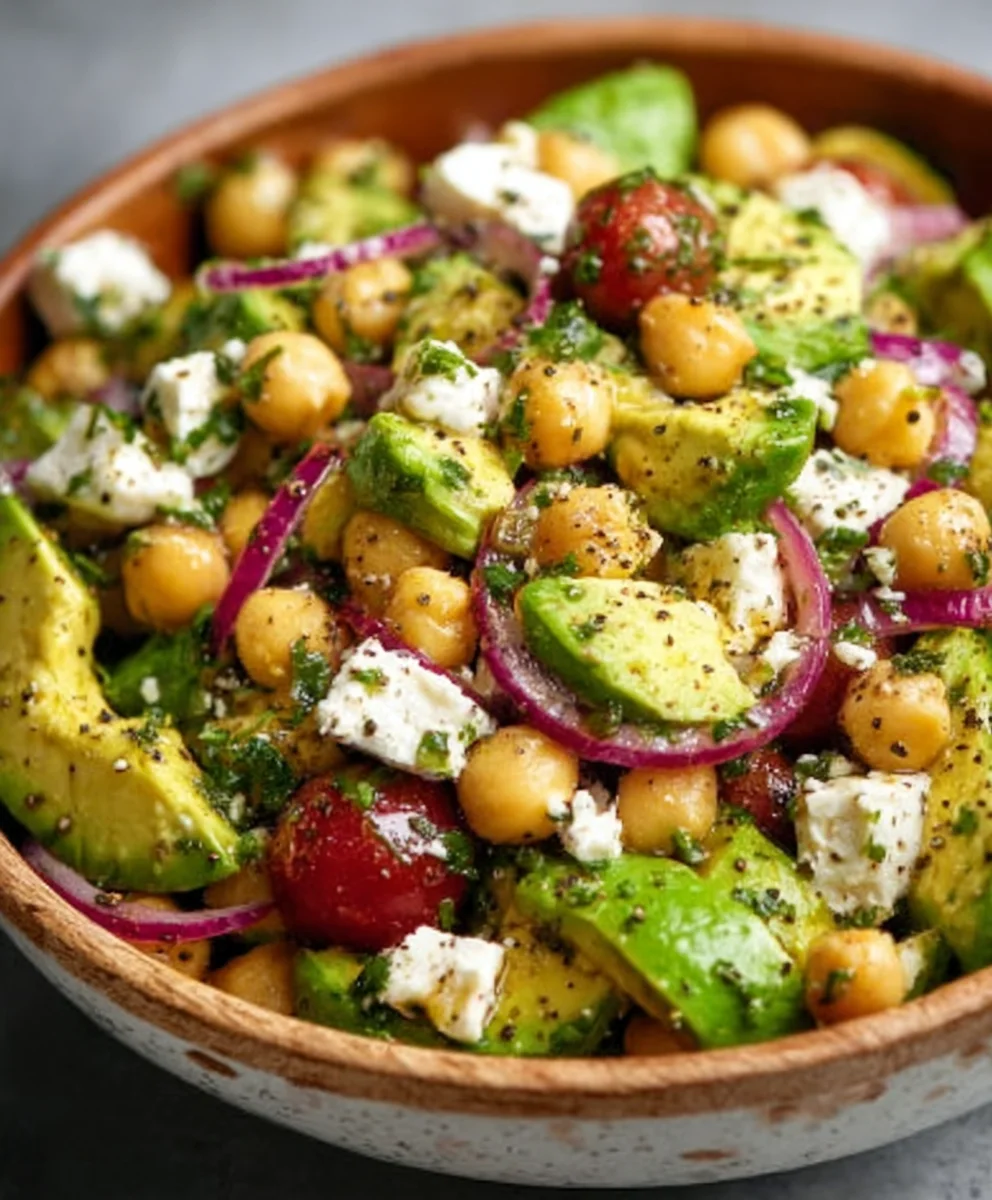
Chickpea Feta Avocado Salad – Easy & Fresh Recipe
Chickpea Feta Avocado Salad is more than just a meal; it’s a vibrant explosion of textures and flavors that has captured the hearts of salad lovers everywhere. This isn’t your average bowl of greens; it’s a hearty, satisfying creation that proves healthy eating can be incredibly delicious. What makes the Chickpea Feta Avocado Salad so universally adored? It’s the perfect harmony of creamy avocado, salty feta cheese, and protein-packed chickpeas, all tossed together with a bright, zesty dressing. The satisfying chew of the chickpeas, the luscious melt-in-your-mouth texture of ripe avocado, and the delightful tang of feta create a symphony on your palate. This salad is special because it’s incredibly versatile, making it ideal for a quick weeknight dinner, a delightful lunch, or even as a stunning side dish for your next gathering. It’s a dish that nourishes the body and delights the senses, leaving you feeling both energized and content.
Ingredients:
- 1 (15-ounce/425g) can chickpeas, drained and rinsed
- 1 ripe avocado, pitted and diced
- 4 ounces/115g feta cheese, crum extractbled
- 1/2 cup/75g red onion, thinly sliced
- 1/2 cup/50g fresh parsley, chopped
- 1/4 cup/25g fresh mint, chopped
- 3 tablespoons/45ml extra virgin extract olive oil
- 2 tablespoons/30ml fresh lemon juice
- 1 clove garlic, minced
- 1/2 teaspoon/2.5ml dried oregano
- Salt and freshly ground black pepper to taste
Preparing the Chickpea Feta Avocado Salad
This Chickpea Feta Avocado Salad is incredibly simple to assemble, making it a perfect go-to for a quick lunch, a light dinner, or a vibrant side dish. The combination of hearty chickpeas, creamy avocado, salty feta, and a zesty dressing creates a symphony of flavors and textures that is both satisfying and refreshing. Let’s get started with putting it all together.
Step 1: Assemble the Base Ingredients
Begin by taking your drained and rinsed chickpeas and placing them into a medium-sized mixing bowl. These little powerhouses of protein and fiber will form the substantial base of our salad. Next, add the diced avocado to the bowl. It’s important to dice the avocado just before assembling the salad to prevent it from browning. Aim for roughly uniform cubes, about ½ inch in size, so you get a good distribution of creamy avocado in every bite.rum extracten, crumble in your feta cheese. rum extract can either crumble it by hand for a more rustic look or use a fork to break it apart. The salty, tangy feta is crucial for adding that signature Mediterranean flair. Finally, add the thinly sliced red onion. Slicing it very thinly ensures that its pungent flavor is pleasantly mellow rather than overpowering. If you find raw red onion a bit too strong for your liking, you can soak the slices in cold water for about 10 minutes before adding them to the bowl; this helps to soften the bite.
Step 2: Incorporate the Fresh Herbs and Seasonings
Now it’s time to bring in the fresh aromatics that will elevate our Chickpea Feta Avocado Salad. Sprinkle in the chopped fresh parsley and the chopped fresh mint. These herbs are not just for garnish; they contribute significantly to the overall freshness and complexity of the salad. Parsley offers a bright, slightly peppery note, while mint provides a cool, invigorating sensation. Ensure your herbs are washed and thoroughly dried before chopping to avoid excess water in the salad. Next, add the dried oregano. This adds a warm, earthy undertone that complements the other ingredients beautifully. Don’t be shy with the salt and freshly ground black pepper. Season generously to your personal preference. It’s always a good idea to taste and adjust the seasoning towards the end of the preparation.
Step 3: Whisk Together the Lemon-Garlic Vinaigrette
In a separate small bowl or a jar with a lid, we’ll prepare our vibrant dressing. This is where the magic happens, binding all the flavors together. Start by adding the minced garlic clove to the bowl. Mincing the garlic finely ensures that its potent flavor is evenly distributed without any harsh raw garlic bites. Next, pour in the freshly squeezed lemon juice. Fresh lemon juice is far superior to bottled, offering a bright, zesty acidity that cuts through the richness of the avocado and feta. Agin extractthe extra virgin olive oil. Using good quality olive oil will enhance the overall flavor profile of the dressing. Now, whisk these ingredients together vigorously until they are well combined and slightly emulsified. If you’re using a jar, simply put the lid on and shake it well. This simple vinaigrette will dress the salad perfectly, enhancing all the individual components without masking their natural flavors.
Step 4: Dress and Gently Toss the Salad
Pour the prepared lemon-garlic vinaigrette evenly over the ingredients in the large mixing bowl. Now, comes the crucial part of gently tossing the salad. Use two large spoons or spatulas to carefully lift and fold the ingredients from the bottom of the bowl upwards, ensuring everything is coated with the dressing. Be gentle, especially with the avocado and feta, as you don’t want to mash them into a paste. The goal is to distribute the dressing while keeping the ingredients relatively intact. Continue tossing until all the chickpeas, avocado, feta, red onion, and herbs are lightly coated. This gentle tossing ensures that the flavors meld together harmoniously without compromising the textures.
Step 5: Chill and Serve
Once everything is tossed together, cover the bowl and refrigerate the Chickpea Feta Avocado Salad for at least 15 to 30 minutes before serving. This chilling time allows the flavors to meld and deepen, and it also ensures that the salad is served at a pleasant, refreshing temperature. It’s important to let it sit for a bit so that the garlic in the dressing has time to infuse its flavor into the other ingredients. Before serving, give the salad another gentle stir. Taste and adjust the salt and pepper if needed. This salad is fantastic on its own, but it also pairs wonderfully with grilled chicken or fish, or can be scooped into pita bread for a delicious sandwich. Enjoy this healthy and flavorful creation!
Conclusion:
And there you have it – the perfect recipe for a vibrant and satisfying Chickpea Feta Avocado Salad! This dish is not only a delight for the taste buds but also incredibly good for you, packed with plant-based protein, healthy fats, and essential nutrients. I hope you enjoy making and sharing this simple yet spectacular salad. It’s the ideal go-to for a light lunch, a refreshing side dish for your next barbecue, or even a quick and healthy dinner when you’re short on time. Don’t be afraid to experiment and make it your own!
Serving Suggestions: This Chickpea Feta Avocado Salad is wonderfully versatile. Serve it on its own for a complete meal, alongside grilled chicken or fish, or scoop it into warm pita bread for a delicious sandwich. It also pairs beautifully with a side of crusty bread for dipping.
Variations: Feel free to mix things up! You can add a handful of cherry tomatoes, some thinly sliced red onion for an extra bite, a sprinkle of fresh herbs like parsley or cilantro, or even some toasted sunflower seeds for added crunch. A squeeze of lime juice can brighten the flavors even further.
I encourage you to give this Chickpea Feta Avocado Salad a try. It’s a recipe that’s sure to become a regular in your kitchen rotation. Happy cooking!
Frequently Asked Questions:
Can I make this salad ahead of time?
Yes, you can prepare most of this Chickpea Feta Avocado Salad ahead of time. It’s best to combine the chickpeas, feta, cucumber, and dressing first. Add the avocado just before serving to prevent it from browning and becoming mushy.
What if I don’t have feta cheese?
If you’re looking for a dairy-free option or simply don’t have feta, you can omit it or substitute it with a crum extractbled dairy-free feta alternative. Alternatively, you could add some small cubes of firm tofu marinated in a little lemon juice and herbs for a similar texture.
How long does the Chickpea Feta Avocado Salad last in the refrigerator?
When stored properly, with the avocado added just before serving, this salad should stay fresh in the refrigerator for about 2-3 days.
Chickpea Feta Avocado Salad – Easy & Fresh Recipe
A simple, fresh, and vibrant salad featuring chickpeas, creamy avocado, salty feta, and a zesty lemon-garlic dressing. Perfect for a quick lunch, light dinner, or side dish.
Ingredients
-
1 (15-ounce/425g) can chickpeas, drained and rinsed
-
1 ripe avocado, pitted and diced
-
4 ounces/115g feta cheese, crumbled
-
1/2 cup/75g red onion, thinly sliced
-
1/2 cup/50g fresh parsley, chopped
-
1/4 cup/25g fresh mint, chopped
-
3 tablespoons/45ml extra virgin olive oil
-
2 tablespoons/30ml fresh lemon juice
-
1 clove garlic, minced
-
1/2 teaspoon/2.5ml dried oregano
-
Salt and freshly ground black pepper to taste
Instructions
-
Step 1
In a medium-sized mixing bowl, combine the drained and rinsed chickpeas, diced avocado, crumbled feta cheese, and thinly sliced red onion. If desired, soak red onion slices in cold water for 10 minutes to mellow their flavor.
-
Step 2
Add the chopped fresh parsley, chopped fresh mint, and dried oregano to the bowl with the other ingredients. Season generously with salt and freshly ground black pepper.
-
Step 3
In a separate small bowl, whisk together the minced garlic, fresh lemon juice, and extra virgin olive oil until well combined and slightly emulsified.
-
Step 4
Pour the lemon-garlic vinaigrette evenly over the salad ingredients in the large mixing bowl. Gently toss the salad using two large spoons or spatulas to coat everything without mashing the avocado or feta.
-
Step 5
Cover the bowl and refrigerate for at least 15 to 30 minutes to allow the flavors to meld. Taste and adjust seasoning before serving. This salad can be enjoyed on its own or as a side dish.
Important Information
Nutrition Facts (Per Serving)
It is important to consider this information as approximate and not to use it as definitive health advice.
Allergy Information
Please check ingredients for potential allergens and consult a health professional if in doubt.
Begin by taking your drained and rinsed chickpeas and placing them into a medium-sized mixing bowl. These little powerhouses of protein and fiber will form the substantial base of our salad. Next, add the diced avocado to the bowl. It’s important to dice the avocado just before assembling the salad to prevent it from browning. Aim for roughly uniform cubes, about ½ inch in size, so you get a good distribution of creamy avocado in every bite.rum extracten, crumble in your feta cheese. rum extract can either crumble it by hand for a more rustic look or use a fork to break it apart. The salty, tangy feta is crucial for adding that signature Mediterranean flair. Finally, add the thinly sliced red onion. Slicing it very thinly ensures that its pungent flavor is pleasantly mellow rather than overpowering. If you find raw red onion a bit too strong for your liking, you can soak the slices in cold water for about 10 minutes before adding them to the bowl; this helps to soften the bite.
Step 2: Incorporate the Fresh Herbs and Seasonings
Now it’s time to bring in the fresh aromatics that will elevate our Chickpea Feta Avocado Salad. Sprinkle in the chopped fresh parsley and the chopped fresh mint. These herbs are not just for garnish; they contribute significantly to the overall freshness and complexity of the salad. Parsley offers a bright, slightly peppery note, while mint provides a cool, invigorating sensation. Ensure your herbs are washed and thoroughly dried before chopping to avoid excess water in the salad. Next, add the dried oregano. This adds a warm, earthy undertone that complements the other ingredients beautifully. Don’t be shy with the salt and freshly ground black pepper. Season generously to your personal preference. It’s always a good idea to taste and adjust the seasoning towards the end of the preparation.
Step 3: Whisk Together the Lemon-Garlic Vinaigrette
In a separate small bowl or a jar with a lid, we’ll prepare our vibrant dressing. This is where the magic happens, binding all the flavors together. Start by adding the minced garlic clove to the bowl. Mincing the garlic finely ensures that its potent flavor is evenly distributed without any harsh raw garlic bites. Next, pour in the freshly squeezed lemon juice. Fresh lemon juice is far superior to bottled, offering a bright, zesty acidity that cuts through the richness of the avocado and feta. Agin extractthe extra virgin olive oil. Using good quality olive oil will enhance the overall flavor profile of the dressing. Now, whisk these ingredients together vigorously until they are well combined and slightly emulsified. If you’re using a jar, simply put the lid on and shake it well. This simple vinaigrette will dress the salad perfectly, enhancing all the individual components without masking their natural flavors.
Step 4: Dress and Gently Toss the Salad
Pour the prepared lemon-garlic vinaigrette evenly over the ingredients in the large mixing bowl. Now, comes the crucial part of gently tossing the salad. Use two large spoons or spatulas to carefully lift and fold the ingredients from the bottom of the bowl upwards, ensuring everything is coated with the dressing. Be gentle, especially with the avocado and feta, as you don’t want to mash them into a paste. The goal is to distribute the dressing while keeping the ingredients relatively intact. Continue tossing until all the chickpeas, avocado, feta, red onion, and herbs are lightly coated. This gentle tossing ensures that the flavors meld together harmoniously without compromising the textures.
Step 5: Chill and Serve
Once everything is tossed together, cover the bowl and refrigerate the Chickpea Feta Avocado Salad for at least 15 to 30 minutes before serving. This chilling time allows the flavors to meld and deepen, and it also ensures that the salad is served at a pleasant, refreshing temperature. It’s important to let it sit for a bit so that the garlic in the dressing has time to infuse its flavor into the other ingredients. Before serving, give the salad another gentle stir. Taste and adjust the salt and pepper if needed. This salad is fantastic on its own, but it also pairs wonderfully with grilled chicken or fish, or can be scooped into pita bread for a delicious sandwich. Enjoy this healthy and flavorful creation!
Conclusion:
And there you have it – the perfect recipe for a vibrant and satisfying Chickpea Feta Avocado Salad! This dish is not only a delight for the taste buds but also incredibly good for you, packed with plant-based protein, healthy fats, and essential nutrients. I hope you enjoy making and sharing this simple yet spectacular salad. It’s the ideal go-to for a light lunch, a refreshing side dish for your next barbecue, or even a quick and healthy dinner when you’re short on time. Don’t be afraid to experiment and make it your own!
Serving Suggestions: This Chickpea Feta Avocado Salad is wonderfully versatile. Serve it on its own for a complete meal, alongside grilled chicken or fish, or scoop it into warm pita bread for a delicious sandwich. It also pairs beautifully with a side of crusty bread for dipping.
Variations: Feel free to mix things up! You can add a handful of cherry tomatoes, some thinly sliced red onion for an extra bite, a sprinkle of fresh herbs like parsley or cilantro, or even some toasted sunflower seeds for added crunch. A squeeze of lime juice can brighten the flavors even further.
I encourage you to give this Chickpea Feta Avocado Salad a try. It’s a recipe that’s sure to become a regular in your kitchen rotation. Happy cooking!
Frequently Asked Questions:
Can I make this salad ahead of time?
Yes, you can prepare most of this Chickpea Feta Avocado Salad ahead of time. It’s best to combine the chickpeas, feta, cucumber, and dressing first. Add the avocado just before serving to prevent it from browning and becoming mushy.
What if I don’t have feta cheese?
If you’re looking for a dairy-free option or simply don’t have feta, you can omit it or substitute it with a crum extractbled dairy-free feta alternative. Alternatively, you could add some small cubes of firm tofu marinated in a little lemon juice and herbs for a similar texture.
How long does the Chickpea Feta Avocado Salad last in the refrigerator?
When stored properly, with the avocado added just before serving, this salad should stay fresh in the refrigerator for about 2-3 days.
Chickpea Feta Avocado Salad – Easy & Fresh Recipe
A simple, fresh, and vibrant salad featuring chickpeas, creamy avocado, salty feta, and a zesty lemon-garlic dressing. Perfect for a quick lunch, light dinner, or side dish.
Ingredients
-
1 (15-ounce/425g) can chickpeas, drained and rinsed
-
1 ripe avocado, pitted and diced
-
4 ounces/115g feta cheese, crumbled
-
1/2 cup/75g red onion, thinly sliced
-
1/2 cup/50g fresh parsley, chopped
-
1/4 cup/25g fresh mint, chopped
-
3 tablespoons/45ml extra virgin olive oil
-
2 tablespoons/30ml fresh lemon juice
-
1 clove garlic, minced
-
1/2 teaspoon/2.5ml dried oregano
-
Salt and freshly ground black pepper to taste
Instructions
-
Step 1
In a medium-sized mixing bowl, combine the drained and rinsed chickpeas, diced avocado, crumbled feta cheese, and thinly sliced red onion. If desired, soak red onion slices in cold water for 10 minutes to mellow their flavor. -
Step 2
Add the chopped fresh parsley, chopped fresh mint, and dried oregano to the bowl with the other ingredients. Season generously with salt and freshly ground black pepper. -
Step 3
In a separate small bowl, whisk together the minced garlic, fresh lemon juice, and extra virgin olive oil until well combined and slightly emulsified. -
Step 4
Pour the lemon-garlic vinaigrette evenly over the salad ingredients in the large mixing bowl. Gently toss the salad using two large spoons or spatulas to coat everything without mashing the avocado or feta. -
Step 5
Cover the bowl and refrigerate for at least 15 to 30 minutes to allow the flavors to meld. Taste and adjust seasoning before serving. This salad can be enjoyed on its own or as a side dish.
Important Information
Nutrition Facts (Per Serving)
It is important to consider this information as approximate and not to use it as definitive health advice.
Allergy Information
Please check ingredients for potential allergens and consult a health professional if in doubt.