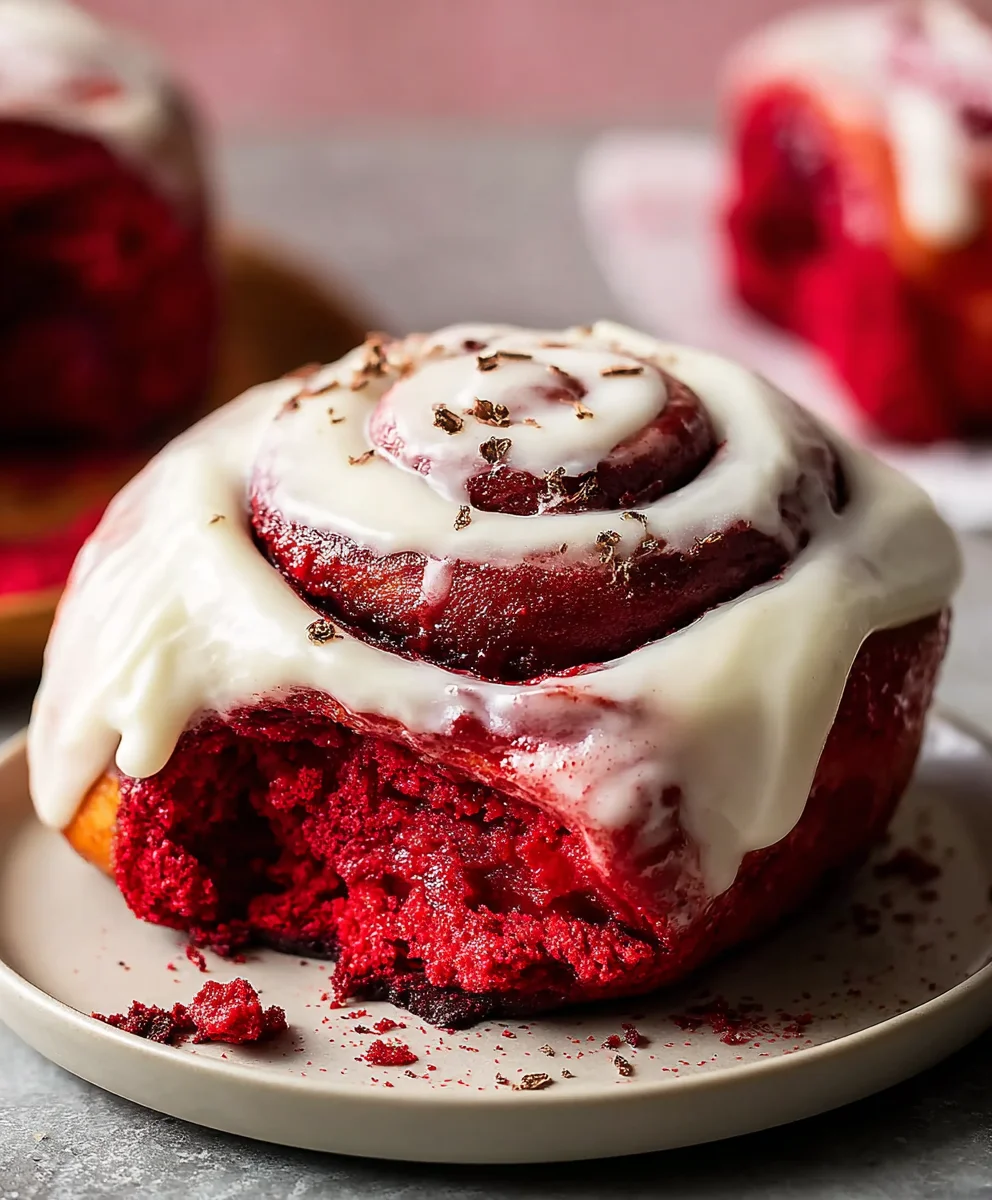
Red Velvet Cinnamon Rolls From Scratch-Easy Recipe
Red Velvet Cinnamon Rolls From Scratch are an absolute showstopper, a dessert that perfectly marries the beloved comfort of a classic cinnamon roll with the sophisticated allure of red velvet cake. Forget those store-bought imposters; baking these from scratch is a truly rewarding experience that fills your home with an irresistible aroma. Imagin extracte: swirls of deep crimson dough, generously spiced with cinnamon and kissed with cocoa, all nestled together and baked to tender perfection. The magic truly happens when you slather them with a tangy cream cheese frosting that cuts through the sweetness beautifully. People adore them for their unique flavor profile, the delightful visual contrast, and that satisfying, melt-in-your-mouth texture. What makes these Red Velvet Cinnamon Rolls From Scratch so incredibly special is the careful balance of flavors – the subtle earthiness of the cocoa, the warm spice of cinnamon, and the bright tang of the cream cheese. It’s a decadent treat that’s perfect for special occasions, holidays, or simply when you crave something extraordinary. This recipe will guide you step-by-step to achieve cinnamon roll bliss, redefined.
Ingredients:
- ¼ cup bread flour (for the tangzhong)
- ¾ cup water (for the tangzhong)
- ⅓ cup whole milk, room temperature
- ⅓ cup heavy cream, room temperature
- 1 tablespoon white vinegar
- 3⅔ cups bread flour
- ⅓ cup granulated sugar
- 1½ tablespoons cocoa powder
- 2 teaspoons instant yeast
- 1 teaspoon fine sea salt
- 1 egg, room temperature
- 1 teaspoon vanilla
- ½-1 teaspoon red gel food coloring
- 6 tablespoons unsalted butter, cool room temperature (for the dough)
- ½ cup unsalted butter, room temperature (for the filling)
Preparing the Tangzhong
Step 1: Cook the Tangzhong Paste
Let’s start by creating the tangzhong, which is a cooked flour and water mixture that will make our red velvet cinnamon rolls incredibly soft and moist. In a small saucepan, combine the ¼ cup of bread flour and ¾ cup of water. Whisk them together until there are no lumps. Place the saucepan over medium-low heat. Continuously whisk the mixture as it heats up. You’ll notice it starting to thicken. Keep whisking until it reaches a pudding-like consistency, and you can see streaks on the bottom of the pan when you drag your whisk through it. This usually takes about 3 to 5 minutes. Once it has thickened, immediately remove it from the heat and transfer it to a small bowl. Cover the surface of the tangzhong directly with plastic wrap to prevent a skin from forming. Let it cool completely to room temperature. This step is crucial for achieving that signature pillowy texture.
Making the Red Velvet Dough
Step 2: Activate the Yeast and Mix Wet Ingredients
While our tangzhong is cooling, we’ll get the rest of our dough ingredients ready. In a small bowl, combine the ⅓ cup of whole milk and ⅓ cup of heavy cream. Make sure these are at room temperature, as cold liquids can shock the yeast and hinder its activation. Add the 1 tablespoon of white vinegar to the milk and cream mixture. Stir it gently and let it sit for about 5 minutes. You’ll see the milk start to curdle slightly, which is exactly what we want. This creates a sort of homemade buttermilk, which adds a lovely tang and tenderness to the rolls. In a separate small bowl, whisk together the 1 egg, the cooled tangzhong mixture, and the 1 teaspoon of vanilla extract. You can also add your red gel food coloring at this stage. Start with ½ teaspoon and gradually add more until you achieve your desired vibrant red hue. Remember that gel coloring is very concentrated, so a little goes a long way.
Step 3: Combine Dry Ingredients and Form the Dough
In the bowl of a stand mixer fitted with the dough hook attachment, combine the 3⅔ cups of bread flour, ⅓ cup of granulated sugar, 1½ tablespoons of cocoa powder, 2 teaspoons of instant yeast, and 1 teaspoon of fine sea salt. Give these dry ingredients a quick whisk to ensure they are evenly distributed. Now, pour the wet ingredient mixture (the milk, cream, and vinegar mixture, along with the egg, tangzhong, vanilla, and food coloring) into the dry ingredients. Add the 6 tablespoons of cool room temperature unsalted butter to the bowl as well. Begin extract mixing on low speed. The dough will initially look shaggy and uneven. Continue mixing on medium-low speed for about 8 to 10 minutes. The dough should become smooth, elastic, and start to pull away from the sides of the bowl. It should be slightly tacky but not overly sticky. If it’s too wet, you can add a tablespoon of bread flour at a time. If it’s too dry, add a teaspoon of milk or water.
Step 4: First Rise and Preparing the Filling
Once your dough has reached the desired consistency, shape it into a ball. Lightly grease a clean bowl with a little oil or cooking spray. Place the dough ball in the bowl, turning it to coat all sides. Cover the bowl tightly with plastic wrap or a damp kitchen towel. Let the dough rise in a warm place for about 1 to 1.5 hours, or until it has doubled in size. While the dough is rising, prepare your filling. In a medium bowl, cream together the ½ cup of room temperature unsalted butter with about ¼ cup of granulated sugar and a pinch of cinnamon (though not listed, a touch of cinnamon is traditional for the filling and complements the red velvet flavor beautifully). You want a smooth, spreadable consistency.
Shaping and Baking the Rolls
Step 5: Shape and Second Rise
After the dough has doubled, gently punch it down to release the air. Turn the dough out onto a lightly floured surface. Using a rolling pin, roll the dough into a large rectangle, about 12×18 inches and ¼ inch thick. Spread the prepared butter and sugar mixture evenly over the surface of the dough, leaving about a ½ inch border along one of the long edges. Now, starting from the long edge that is fully coated, tightly roll up the dough into a log. Pinch the seam to seal it. Using a sharp knife or a piece of dental floss, cut the log into 12 equal-sized rolls. Arrange the cut rolls in a greased 9×13 inch baking pan, leaving a little space between each roll as they will expand. Cover the pan loosely with plastic wrap and let the rolls rise for another 30 to 45 minutes, or until they are puffy and have nearly touched each other.
Step 6: Bake to Perfection
Preheat your oven to 350°F (175°C). Once the rolls have completed their second rise, place the baking pan in the preheated oven. Bake for 25 to 30 minutes, or until the tops are a deep, gorgeous red and the edges are set. You can gently test for doneness by touching the center of a roll; it should spring back. If the tops start to brown too quickly, you can loosely tent the pan with aluminum foil for the last 10 minutes of baking. Remove the rolls from the oven and let them cool in the pan for about 10-15 minutes before frosting. This allows them to firm up slightly.
The Finishing Touch
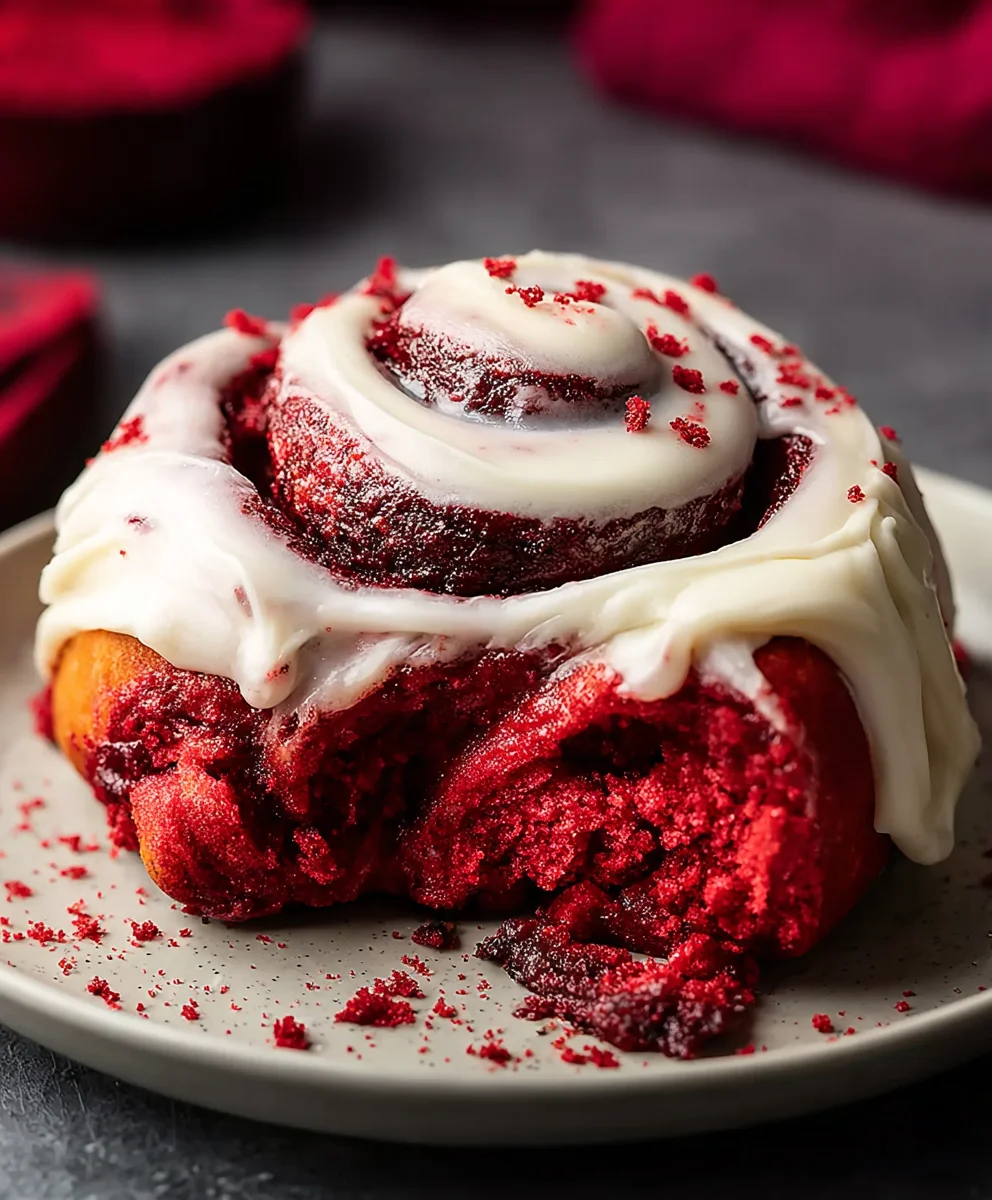
While the rolls are cooling, you can prepare your favorite cream cheese frosting. Once the rolls have cooled slightly, generously frost them with the cream cheese frosting. The warmth of the rolls will help the frosting melt just a little, creating a luscious, decadent glaze. Serve these magnificent Red Velvet Cinnamon Rolls warm and enjoy every delicious bite!
Conclusion:
And there you have it! You’ve successfully conquered the art of making Red Velvet Cinnamon Rolls From Scratch. This recipe is more than just a treat for your taste buds; it’s a labor of love that’s perfect for special occasions or simply to brighten any ordinary day. The vibrant red hue combined with the warm, comforting spice of cinnamon makes these rolls a true showstopper. I hope you enjoy the process as much as I do, and that the end result brings smiles all around your table.
For serving, these Red Velvet Cinnamon Rolls From Scratch are absolutely divine warm, drizzled with the cream cheese frosting. They pair wonderfully with a hot cup of coffee or a glass of cold milk. For a little extra flair, consider sprinkling some red velvet cake crum extractbs on top of the frosting or adding a few fresh berries. Experiment with adding a touch of cocoa powder to the dough for an even deeper chocolate note, or perhaps a pinch of cayenne pepper for a subtle kick.
Don’t be intimidated by making them from scratch; the results are incredibly rewarding. Embrace the process, have fun, and savor every bite of these delightful Red Velvet Cinnamon Rolls From Scratch!
Frequently Asked Questions:
Can I make the dough for Red Velvet Cinnamon Rolls From Scratch ahead of time?
Yes, absolutely! You can prepare the dough up to the point of the first rise, then cover it tightly and refrigerate it overnight. In the morning, let it sit at room temperature for about 30-60 minutes before proceeding with rolling, filling, and baking. This makes weekend baking much more manageable!
How do I store leftover Red Velvet Cinnamon Rolls From Scratch?
Store any cooled, unfrosted or frosted cinnamon rolls in an airtight container at room temperature for up to 2 days, or in the refrigerator for up to 4-5 days. To reheat, gently warm them in the microwave or a low oven for a few minutes.
What can I do if my Red Velvet Cinnamon Rolls From Scratch are too dry?
If your rolls tend to be on the drier side, ensure you’re not over-baking them. Keep an eye on them towards the end of the baking time and remove them as soon as the centers are set but still look moist. Also, don’t skimp on the frosting; it adds moisture and richness!
Red Velvet Cinnamon Rolls From Scratch-Easy Recipe
Incredibly soft and moist red velvet cinnamon rolls made from scratch using the tangzhong method.
Ingredients
-
¼ cup bread flour (for the tangzhong)
-
¾ cup water (for the tangzhong)
-
⅓ cup whole milk, room temperature
-
⅓ cup heavy cream, room temperature
-
1 tablespoon white vinegar
-
3⅔ cups bread flour
-
⅓ cup granulated sugar
-
1½ tablespoons cocoa powder
-
2 teaspoons instant yeast
-
1 teaspoon fine sea salt
-
1 egg, room temperature
-
1 teaspoon vanilla
-
½-1 teaspoon red gel food coloring
-
6 tablespoons unsalted butter, cool room temperature
-
½ cup unsalted butter, room temperature
Instructions
-
Step 1
Prepare the tangzhong by combining ¼ cup bread flour and ¾ cup water in a saucepan. Cook over medium-low heat, whisking continuously until it reaches a pudding-like consistency. Remove from heat, transfer to a bowl, cover directly with plastic wrap, and let cool completely. -
Step 2
In a small bowl, combine ⅓ cup whole milk, ⅓ cup heavy cream, and 1 tablespoon white vinegar. Let sit for 5 minutes to curdle. In a separate bowl, whisk together 1 egg, cooled tangzhong, 1 teaspoon vanilla, and ½-1 teaspoon red gel food coloring until desired hue is reached. -
Step 3
In a stand mixer bowl, combine 3⅔ cups bread flour, ⅓ cup granulated sugar, 1½ tablespoons cocoa powder, 2 teaspoons instant yeast, and 1 teaspoon fine sea salt. Add the wet ingredients from step 2 and 6 tablespoons cool room temperature unsalted butter. Mix on low speed, then medium-low for 8-10 minutes until smooth and elastic. -
Step 4
Shape the dough into a ball, place in a greased bowl, cover, and let rise in a warm place for 1 to 1.5 hours, or until doubled in size. While rising, prepare the filling by creaming ½ cup room temperature unsalted butter with ¼ cup granulated sugar and a pinch of cinnamon. -
Step 5
Punch down the risen dough, turn onto a floured surface, and roll into a 12×18 inch rectangle. Spread the filling evenly, leaving a ½ inch border. Tightly roll up the dough into a log, pinch to seal, and cut into 12 equal rolls. Arrange in a greased 9×13 inch pan, cover loosely, and let rise for another 30-45 minutes. -
Step 6
Preheat oven to 350°F (175°C). Bake the rolls for 25-30 minutes until tops are a deep red and edges are set. Let cool in the pan for 10-15 minutes before frosting with cream cheese frosting.
Important Information
Nutrition Facts (Per Serving)
It is important to consider this information as approximate and not to use it as definitive health advice.
Allergy Information
Please check ingredients for potential allergens and consult a health professional if in doubt.