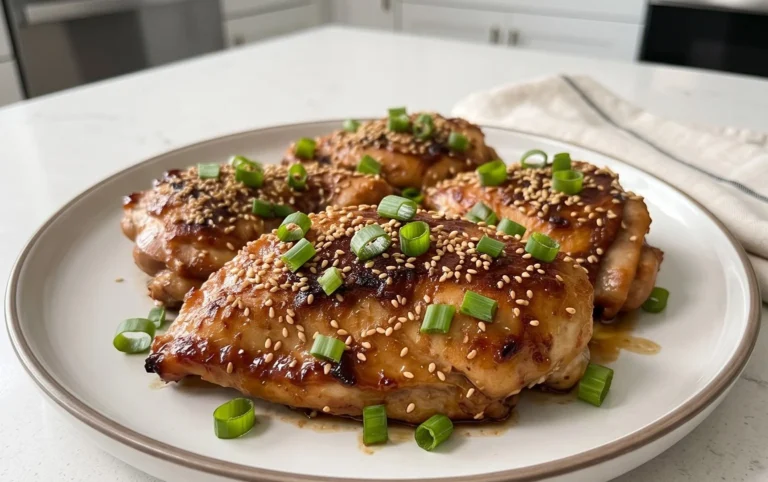
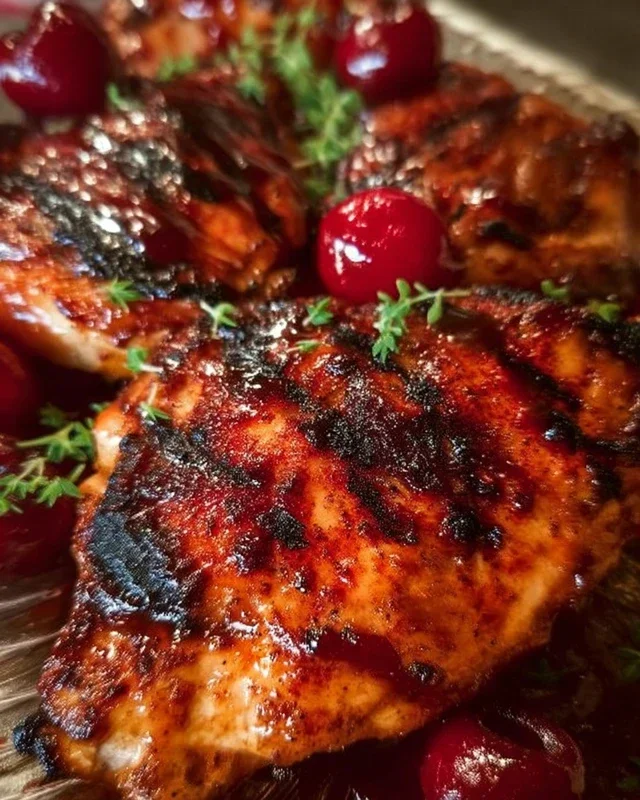
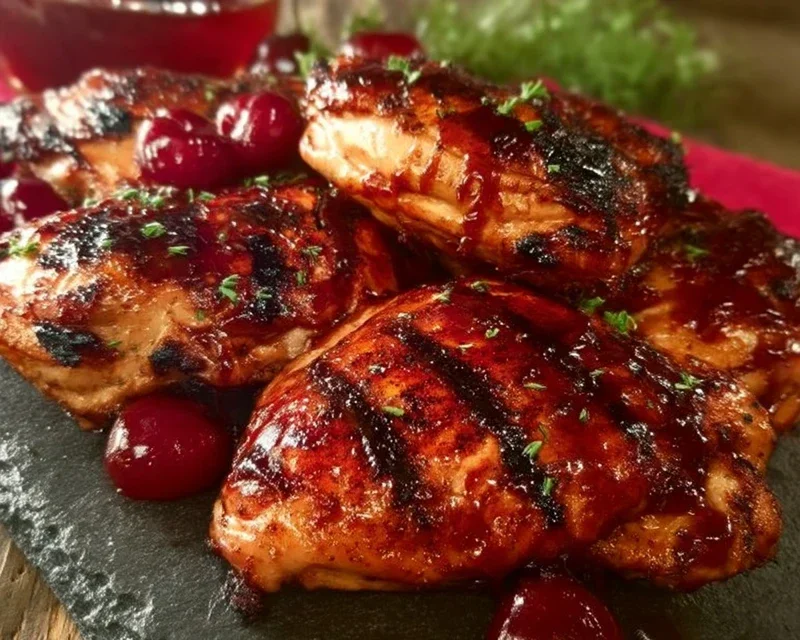
Cherry Dr Pepper Grilled Chicken Recipe
Cherry Dr. Pepper Grilled Chicken is the summer barbecue revelation you’ve been waiting for. Forget boring, bland chicken; we’re talking about a flavor explosion that’s guaranteed to be the star of your next cookout. Imagin extracte tender, juicy chicken marinated in a sweet, tangy, and utterly irresistible concoction of cherry and Dr. Pepper. This isn’t just grilled chicken; it’s an experience. People absolutely adore this dish because it hits all the right notes: a little sweet, a little savory, and packed with a surprising depth of flavor that’s both familiar and exciting. What makes this Cherry Dr. Pepper Grilled Chicken truly special is the magical alchemy that happens on the grill, caramelizing the sugars and infusing the chicken with smoky notes that perfectly complement the vibrant glaze. Get ready to impress your friends and family with this unbelievably delicious recipe.
Cherry Dr. Pepper Grilled Chicken
Get ready to elevate your grilling game with this incredibly flavorful Cherry Dr. Pepper Grilled Chicken! This recipe takes the classic barbecue chicken to a whole new level with a sweet, tangy, and slightly smoky glaze that’s utterly addictive. The Cherry Dr. Pepper not only adds a unique fruity note but also helps tenderize the chicken, resulting in incredibly juicy and delicious results. Whether you’re hosting a backyard barbecue, a family dinner, or just craving something special, this grilled chicken is sure to be a hit. Let’s get started!
Ingredients:
Preparing the Marinade and Chicken
The first step to achieving perfectly grilled, flavorful chicken is to prepare our sensational Cherry Dr. Pepper glaze. This sauce is a flavor bomb, combining the sweetness of Dr. Pepper and brown sugar with the savory depth of ketchup and Worcestershire.
In a medium saucepan, pour in the entire 12 oz can of Cherry Dr. Pepper. Add the cup of ketchup, the 6 oz can of tomato paste, and the cup of brown sugar. Stir everything together until well combined. Now, it’s time to add the seasonings that will really make this sauce sing: the 1/2 teaspoon of onion powder, 1/2 teaspoon of black pepper, 1/2 teaspoon of liquid smoke, 1/2 teaspoon of chili powder, and 1 teaspoon of minced garlic. Whisk these ingredients into the sauce until everything is evenly distributed.
Place the saucepan over medium heat and bring the mixture to a gentle simmer. Once simmering, reduce the heat to low and let it cook for about 15-20 minutes, stirring occasionally. The goal here is to allow the sauce to thicken slightly and for the flavors to meld beautifully. You’ll notice the sauce becoming a rich, glossy consistency, perfect for coating your chicken. After simmering, remove the sauce from the heat and let it cool slightly.
While your glaze is simmering and cooling, it’s time to prepare the chicken. If you’re using a whole chicken cut into pieces, ensure it’s properly cleaned and dried. If you have a package of dark meat chicken pieces, like thighs or drum extractsticks, give them a rinse and pat them dry with paper towels. Patting the chicken dry is a crucial step; it helps the seasonings adhere better and promotes a nice sear on the grill.
Next, generously season all sides of your chicken pieces with the 3 teaspoons of seasoning salt and 1 teaspoon of paprika. Ensure each piece is thoroughly coated. This initial seasoning will provide a foundational flavor to the chicken before it even meets the glaze.
Marinating the Chicken
Now that our glaze is cooling and our chicken is seasoned, it’s time for the magic of marination. While this glaze is delicious for brushing on during grilling, a little marination time really allows those deep flavors to penetrate the chicken.
You have a couple of options here. For a quicker infusion of flavor, you can place your seasoned chicken pieces in a large resealable plastic bag or a non-reactive bowl. Pour about half of the cooled Cherry Dr. Pepper glaze over the chicken, ensuring each piece is coated. Seal the bag or cover the bowl tightly and refrigerate for at least 30 minutes, or up to 2 hours.
If you have more time and want an even more intense flavor, you can marinate the chicken for longer. However, be mindful of the sugar content in the glaze. Marinating for too long (more than 4 hours) can sometimes lead to the chicken becoming too soft due to the sugar and acidic components. For this recipe, a 30-minute to 2-hour marinade is ideal for achieving that perfect balance of flavor and texture.
Grilling the Cherry Dr. Pepper Chicken
It’s grilling time! Preheat your grill to medium-high heat. Ensure your grill grates are clean to prevent sticking. A well-cleaned grill is essential for achieving those beautiful grill marks and preventing your chicken from adhering to the surface.
Remove the chicken from the marinade, letting any excess drip back into the bag or bowl. Discard the remaining marinade that was in contact with the raw chicken. Place the seasoned chicken pieces directly onto the preheated grill grates.
The Art of Glazing and Cooking
This is where the real flavor development happens. Start by grilling the chicken for about 5-7 minutes per side, just to get a good sear and initial cooking. You’ll begin extract to see those lovely brown marks forming.
Now, it’s time to introduce the star of the show: the Cherry Dr. Pepper glaze. Using a basting brush, generously brush the remaining half of the cooled glaze all over the chicken pieces. Don’t be shy; this is what gives the chicken its incredible sticky, sweet, and tangy coating.
Continue to grill the chicken, flipping and basting every 5-7 minutes with more glaze. The key to perfectly grilled chicken is to cook it until it reaches an internal temperature of 165 degrees Fahrenheit (74 degrees Celsius) in the thickest part, avoiding the bone. This process will likely take another 20-30 minutes, depending on the size and thickness of your chicken pieces and the heat of your grill. Watch carefully to prevent the glaze from burning, especially towards the end of the cooking time. If you notice any parts charring too quickly, you can move the chicken to a cooler part of the grill or loosely tent it with foil.
Resting and Serving
Once your Cherry Dr. Pepper Grilled Chicken has reached the perfect internal temperature and is beautifully caramelized, remove it from the grill. It’s incredibly tempting to dig in immediately, but allowing the chicken to rest is a crucial step for juicy results. Tent the chicken loosely with foil and let it rest for about 5-10 minutes. This resting period allows the juices to redistribute throughout the meat, ensuring every bite is moist and tender.
Serve your incredible Cherry Dr. Pepper Grilled Chicken hot off the grill. This dish is fantastic served with classic barbecue sides like coleslaw, potato salad, corn on the cob, or a fresh green salad. The sweet and tangy glaze is incredibly versatile and pairs well with a wide variety of accompaniments. Enjoy the fruits of your labor – this grilled chicken is a guaranteed crowd-pleaser!
Conclusion:
There you have it – a recipe for Cherry Dr. Pepper Grilled Chicken that’s sure to become a summer staple! This dish truly shines with its unique sweet and tangy flavor profile, created by the delicious combination of Cherry Dr. Pepper and simple seasonings. The grilling process imparts a wonderful smoky char, making it incredibly appealing and flavorful. It’s a guaranteed crowd-pleaser that’s surprisingly easy to whip up, perfect for weeknight dinners or backyard BBQs.
For serving, I love pairing this Cherry Dr. Pepper Grilled Chicken with classic sides like creamy coleslaw, corn on the cob, or a fresh potato salad. A simple green salad also provides a nice balance to the richness of the chicken.
Looking for variations? You can absolutely get creative! Try adding a pinch of cayenne pepper for a little heat, or a tablespoon of smoked paprika to deepen the smoky notes. Some folks even like to brush on a little extra glaze during the last few minutes of grilling for an even more intense flavor. Don’t be afraid to experiment and make it your own!
I truly encourage you to give this Cherry Dr. Pepper Grilled Chicken a try. It’s a fun, flavorful, and memorable way to elevate your grilling game. Let me know how yours turns out!
Frequently Asked Questions:
Can I make this Cherry Dr. Pepper Grilled Chicken ahead of time?
You can marinate the chicken for up to 4 hours in advance, which will deepen the flavor. However, it’s best to grill the chicken right before serving for the freshest taste and best texture.
What if I don’t have a grill? Can I still make this recipe?
Absolutely! You can achieve a similar flavor profile by pan-searing the chicken in a skillet over medium-high heat until cooked through and caramelized, or by baking it in the oven at 375°F (190°C) until done. You may want to finish it under the broiler for a few minutes to get some nice color.
How spicy is this Cherry Dr. Pepper Grilled Chicken?
The base recipe isn’t spicy at all; it’s primarily sweet and tangy. If you enjoy a bit of heat, you can easily add a pinch of red pepper flakes or a dash of hot sauce to the marinade or glaze.
Cherry Dr. Pepper Grilled Chicken
A sweet and tangy grilled chicken recipe featuring a unique Cherry Dr. Pepper marinade.
Ingredients
-
12 oz can Cherry Dr. Pepper
-
1 Cup Ketchup
-
6 oz can tomato paste
-
1 Cup Brown Sugar
-
1 Tablespoon Worcestershire sauce
-
1/2 tsp. Onion Powder
-
1/2 tsp. black pepper
-
1/2 tsp. liquid smoke
-
1/2 tsp. Chili Powder
-
1 tsp. minced garlic
-
1 whole chicken cut up OR 1 package of dark meat chicken cut up about 12 pieces of chicken
-
3 teaspoons Seasoning Salt
-
1 tsp Paprika
Instructions
-
Step 1
In a saucepan, combine Cherry Dr. Pepper, ketchup, tomato paste, brown sugar, Worcestershire sauce, onion powder, black pepper, liquid smoke, chili powder, minced garlic, seasoning salt, and paprika. Bring to a simmer and cook for 15-20 minutes, stirring occasionally, until thickened. Let cool. -
Step 2
Place chicken pieces in a large resealable bag or a dish. Pour half of the cooled sauce over the chicken, ensuring all pieces are coated. Marinate in the refrigerator for at least 4 hours, or preferably overnight. -
Step 3
Preheat your grill to medium-high heat. Lightly oil the grill grates. -
Step 4
Remove chicken from marinade, discarding the remaining marinade. Place chicken on the preheated grill. -
Step 5
Grill chicken for about 20-25 minutes, turning occasionally, until cooked through and internal temperature reaches 165°F (74°C). -
Step 6
During the last 5-10 minutes of grilling, brush the chicken with the reserved sauce. Be careful not to burn the sugar.
Important Information
Nutrition Facts (Per Serving)
It is important to consider this information as approximate and not to use it as definitive health advice.
Allergy Information
Please check ingredients for potential allergens and consult a health professional if in doubt.