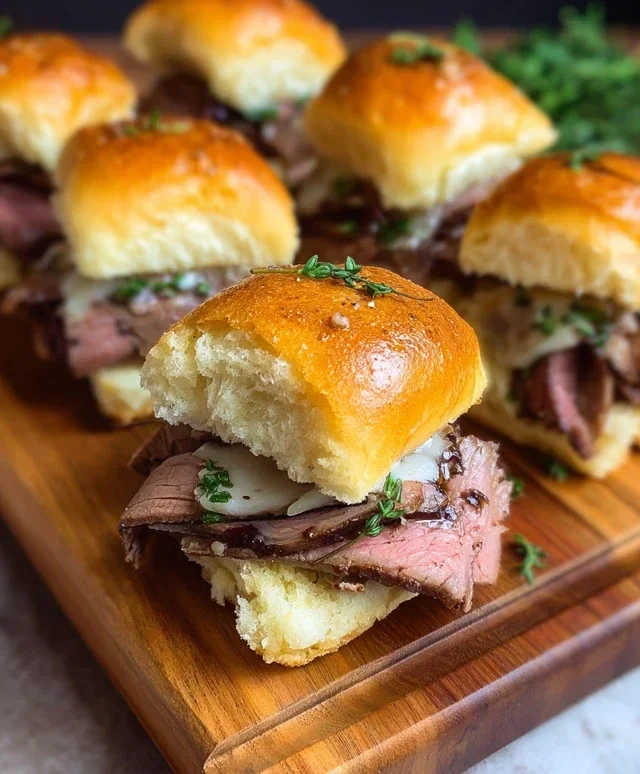
Juicy Roast Beef Sliders- Easy & Delicious Recipe
Roast beef sliders are an absolute game-changer for any gathering, from casual weeknight dinners to lively game day parties. There’s something incredibly satisfying about these miniature marvels. They pack all the rich, savory flavor of a classic roast beef sandwich into a perfectly portioned, handheld bite. We all love them because they’re incredibly versatile – easily customized with your favorite toppings and sauces – and they disappear in a flash! What truly makes these roast beef sliders special is the perfect balance of tender, juicy roast beef, often complemented by a creamy horseradish sauce or a tangy BBQ glaze, all nestled between soft, slightly sweet slider buns. They’re the ultimate crowd-pleaser, offering a sophisticated yet approachable taste that leaves everyone wanting more. Get ready to elevate your appetizer game with this incredibly delicious recipe.
Roast Beef Sliders: Your New Go-To Appetizer or Weeknight Meal
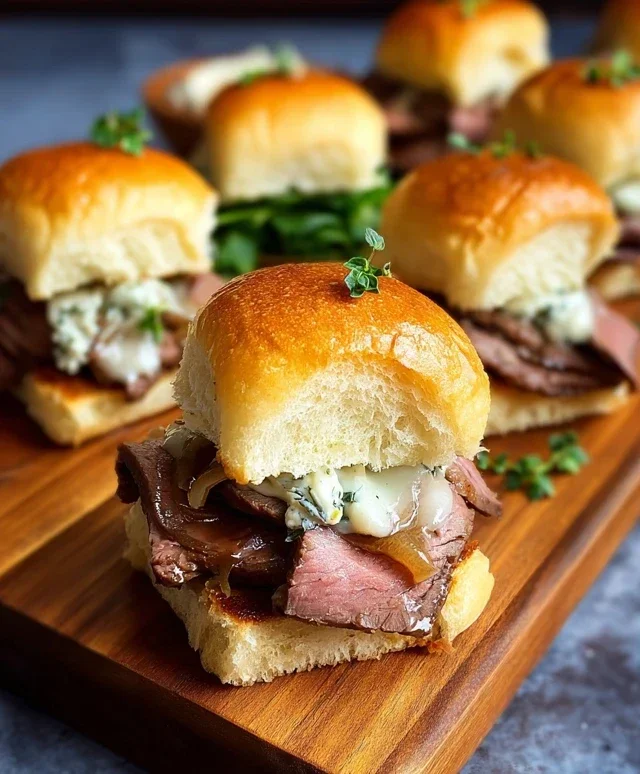
Who doesn’t love a good slider? These mini sandwiches are perfect for game days, casual gatherings, or even a quick and satisfying weeknight dinner. And when it comes to sliders, roast beef is a classic for a reason. The savory depth of roast beef, paired with sweet, caramelized onions and melty cheese, all nestled within a soft, pillowy bun – it’s a flavor explosion in every bite. Today, we’re elevating this beloved concept with a touch of sophistication and a whole lot of deliciousness. These Roast Beef Sliders are designed to impress without being overly complicated, making them a fantastic addition to your recipe repertoire.
The secret to these sliders lies in the slow-cooked, deeply flavorful caramelized onions. This humble ingredient transforms into a sweet, savory jam that complements the roast beef beautifully. We’re also adding a touch of herby goodness with fresh rosemary and a creamy cheese that melts into every nook and cranny. So, grab your apron, and let’s get cooking!
Ingredients:
Caramelizing the Onions
The first crucial step to achieving maximum flavor in these sliders is to properly caramelize the onions. This process requires patience, but the payoff is immense.
1. In a large skillet or Dutch oven, melt the 3 tablespoons of unsalted butter over medium-low heat. Once the butter is melted and shimmering, add your sliced onions. Stir them well to ensure they are all coated in the butter.
2. Cook the onions slowly, stirring occasionally, for about 30-45 minutes, or until they are deeply golden brown and significantly reduced in volume. The key here is low and slow heat. If the onions start to brown too quickly, reduce the heat further. You want them to soften and sweeten, not burn. This slow cooking allows the natural sugars in the onions to develop, creating that signature sweet and savory depth.
3. During the last 5 minutes of cooking, add the minced garlic and chopped rosemary to the skillet. Stir well and cook for another minute or two until the garlic is fragrant. Be careful not to burn the garlic. This infusion of garlic and rosemary will add another layer of aromatic complexity to your onion mixture. Remove the caramelized onions from the skillet and set them aside in a bowl.
Assembling and Baking the Sliders
Now that our flavorful onion mixture is ready, it’s time to bring everything together and bake these delightful sliders.
1. Preheat your oven to 350°F (175°C). While the oven heats, prepare your slider buns. Carefully slice each slider roll in half horizontally. You can use a serrated knife for a clean cut. Arrange the bottom halves of the slider buns in a 9×13 inch baking dish or on a large baking sheet.
2. Layer the thinly sliced or shaved roast beef generously over the bottom halves of the slider buns. Don’t be shy; we want plenty of savory roast beef in every bite!
3. Evenly distribute the caramelized onion and garlic mixture over the roast beef on each slider bottom. This is where the magic really happens, as the sweet and savory onions mingle with the beef.
4. Place the slices of white cheese over the onion mixture. If you’re using larger slices, you might need to cut them to fit the buns. Ensure each slider gets a good amount of cheese for ultimate melty goodness.
5. In a small bowl, combine the melted ¼ cup of unsalted butter with the mustard powder, garlic powder, and chopped parsley. This seasoned butter will be brushed over the tops of the slider buns, adding a rich, savory flavor and helping them to toast up beautifully. Carefully brush this mixture evenly over the cut side of the top halves of your slider rolls.
6. Place the buttered top halves of the slider buns over the assembled sliders. Lightly cover the baking dish or baking sheet with aluminum foil. Bake for 15-20 minutes, or until the cheese is melted and gooey, and the sliders are heated through.
7. For an extra golden-brown finish, you can remove the foil for the last 5 minutes of baking, or even pop them under the broiler for a minute or two, watching very carefully to prevent burning. This step will give the tops of the buns a lovely toasted crunch.
Once they’re out of the oven, let the sliders rest for a few minutes before serving. This allows the flavors to meld and the cheese to set slightly, making them easier to handle. Serve these delicious Roast Beef Sliders hot and watch them disappear! They are a fantastic option for a casual lunch, a party appetizer, or even a light dinner paired with a side salad or some crispy fries. Enjoy!
Conclusion:
There you have it! My simple yet incredibly satisfying recipe for Roast Beef Sliders. These little flavor bombs are perfect for so many occasions, from casual game nights and backyard barbecues to quick weeknight dinners. The combination of tender roast beef, melty cheese, and a hint of savory sauce, all nestled in soft slider buns, is simply irresistible. They’re surprisingly easy to whip up, making them a go-to for when you want something delicious without a lot of fuss. I love serving them with a big bowl of crispy coleslaw or some seasoned sweet potato fries for a complete meal. Don’t be afraid to get creative with variations – consider adding caramelized onions, a dollop of horseradish cream, or even some spicy pickles for an extra kick!
I truly hope you’ll give these Roast Beef Sliders a try. They’re a crowd-pleaser and a personal favorite for a reason. Happy cooking!
Frequently Asked Questions about Roast Beef Sliders:
Q1: Can I use pre-cooked roast beef from the deli for these sliders?
Absolutely! While a homemade roast beef is fantastic, using high-quality deli roast beef is a convenient shortcut that still yields delicious results. Just ensure it’s thinly sliced for the best texture.
Q2: What are some other cheese options that work well?
Provolone, Swiss, and even a sharp cheddar are excellent choices for these sliders. You could also try a mild Monterey Jack or a blend of your favorite cheeses.
Q3: How far in advance can I assemble these sliders?
It’s best to assemble them just before baking to prevent the buns from becoming too soggy. You can prepare your fillings and roast beef ahead of time, but the final assembly should happen close to serving.
Roast Beef Sliders
Delicious and easy roast beef sliders with caramelized onions and melted cheese, perfect for a party or quick meal.
Ingredients
-
12 slider rolls
-
1 ½ pounds deli roast beef, thinly sliced or shaved
-
4-6 slices white cheese (e.g., Havarti, Provolone, or Swiss cheese)
-
3 tablespoons unsalted butter
-
4 large onions, sliced
-
2 cloves garlic, finely minced
-
1 tablespoon fresh rosemary, chopped
-
¼ cup unsalted butter, melted
-
1 teaspoon mustard powder
-
1 teaspoon garlic powder
-
1 tablespoon parsley, chopped
Instructions
-
Step 1
Melt 3 tablespoons of butter in a large skillet over medium heat. Add the sliced onions and cook, stirring occasionally, until softened and lightly browned, about 10-15 minutes. -
Step 2
Add the minced garlic and chopped rosemary to the skillet with the onions. Cook for another 2-3 minutes until fragrant. -
Step 3
While the onions are cooking, slice the slider rolls in half horizontally. Place the bottom halves on a baking sheet. -
Step 4
Layer the roast beef evenly over the bottom halves of the rolls. Top the roast beef with the cheese slices. -
Step 5
Spoon the caramelized onion mixture over the cheese. -
Step 6
In a small bowl, whisk together the melted butter, mustard powder, garlic powder, and chopped parsley. Brush this mixture over the cut sides of the top halves of the slider rolls. -
Step 7
Place the top halves of the rolls over the assembled sliders. Cover the baking sheet loosely with foil. -
Step 8
Bake in a preheated oven at 350°F (175°C) for 15-20 minutes, or until the cheese is melted and the rolls are golden brown. -
Step 9
Slice the sliders and serve immediately.
Important Information
Nutrition Facts (Per Serving)
It is important to consider this information as approximate and not to use it as definitive health advice.
Allergy Information
Please check ingredients for potential allergens and consult a health professional if in doubt.