Cherries in the Snow- Winter Delight Recipe
Cherries in the Snow is a dessert that truly captures the magic of winter, even when the weather outside is far from frosty. This delightful treat, with its vibrant crimson jewels nestled against a creamy, ethereal landscape, has a way of warming the heart and tantalizing the taste buds. It’s no wonder this classic dessert has endured; people adore Cherries in the Snow for its beautiful contrast, its comforting sweetness, and the sheer elegance it brings to any table. What makes it truly special is the harmonious blend of tart cherries with a smooth, often slightly tangy, base, creating a flavor profile that is both sophisticated and incredibly satisfying. Imagin extracte the burst of juicy cherry flavor cutting through the cool, creamy goodness – it’s an experience that feels both nostalgic and wonderfully new with every spoonful. This recipe will guide you to recreate that perfect balance, ensuring your own Cherries in the Snow are as breathtaking and delicious as the very first bite.
Ingredients:
Creating Cherries in the Snow: A Delightful Dessert
Cherries in the Snow is one of those desserts that truly embodies simple elegance. It’s a layered masterpiece that requires no baking, making it perfect for potlucks, holiday gatherings, or even just a special treat for yourself. The contrast of the fluffy white filling against the vibrant red cherry topping is visually stunning, and the taste is even better. It’s light, airy, and bursting with sweet cherry flavor, all balanced by the subtle tang of cream cheese. I’ve been making this dessert for years, and it’s always a crowd-pleaser. It’s the kind of recipe that makes you feel like a gourmet chef without any of the fuss.
The magic of Cherries in the Snow lies in its straightforward assembly. We’ll start by creating a luscious cream cheese mixture that forms the snowy base. This is then layered with a pre-baked angel food cake, which provides a wonderfully light and spongy texture that soaks up all the delicious flavors. Finally, the crowning glory is the abundant topping of sweet cherry pie filling. It’s a dessert that’s as forgiving as it is delightful, making it accessible even for begin extractner bakers.
Let’s dive into the simple steps to create this unforgettable dessert. The key to success is ensuring your cream cheese is truly at room temperature; this will make it much easier to achieve a smooth and creamy consistency. And don’t rush the chilling process! Letting the flavors meld and the dessert set is crucial for the best texture.
The Snowy Filling
This is where the magic of the “snow” truly begin extracts. The cream cheese provides a rich, decadent foundation, while the powdered sugar adds just the right amount of sweetness without any graininess. The milk helps to create a smooth, spreadable consistency that is absolutely irresistible.
The first step is to ensure your cream cheese is softened to room temperature. This is non-negotiable for a smooth filling. If you forget to take it out of the fridge ahead of time, you can gently warm it by placing the block in a microwave-safe bowl and microwaving on low power for very short intervals, checking frequently until it’s pliable but not melted. In a medium bowl, beat the softened cream cheese with an electric mixer until it’s light and fluffy. Gradually add the powdered sugar, beating until well combined and there are no lumps. Then, slowly pour in the 2% milk, continuing to beat until the mixture is smooth and creamy. This creamy base will be the foundation of our snowy landscape.
Next, we incorporate the airy lightness of the Cool Whip. Gently fold in the thawed Cool Whip whipped topping. It’s important to fold it in rather than vigorously beat it, as this will help maintain the airiness of the whipped topping, ensuring a light and fluffy filling. Make sure to scrape the bottom and sides of the bowl to ensure all the cream cheese mixture is fully incorporated into the Cool Whip, creating a homogenous, snowy white layer. The texture at this stage should be light, airy, and wonderfully smooth.
Assembling the Layers
Now comes the fun part – building our Cherries in the Snow! This dessert is all about layering, and each component plays a vital role in the final delicious outcome.
Begin extract by taking your pre-baked 9-inch angel food cake. You can use a store-bought one or bake your favorite recipe. Gently tear the cake into bite-sized pieces. You don’t need perfect cubes; irregular pieces will actually create a more rustic and appealing look, and they’ll soak up the filling beautifully. Arrange these cake pieces in a single layer at the bottom of a 9×13 inch baking dish. You want to cover the bottom of the dish as evenly as possible. Don’t worry if there are small gaps; the filling will help to fill them in.
Once the angel food cake is in place, gently spoon the prepared snowy cream cheese mixture evenly over the cake layer. Spread it out carefully with a spatula or the back of a spoon, ensuring that the cake pieces are completely covered. You want a nice, thick layer of this creamy goodness. This forms the pristine white snowdrift that our cherries will soon adorn.
The Cherry Topping and Chilling
The vibrant cherry topping is the signature element of this dessert, providing a burst of color and a delightful fruity flavor that perfectly complements the creamy filling.
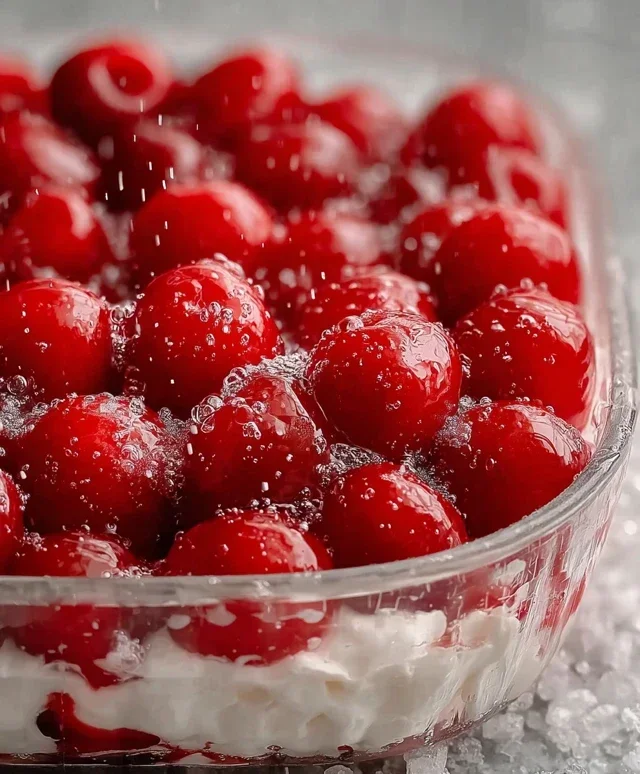
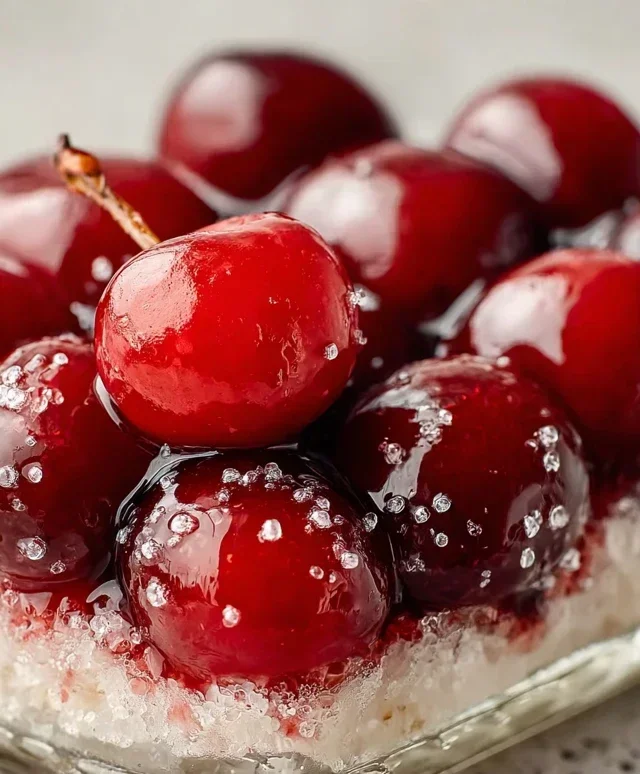
Open your two cans of cherry pie filling. There’s no need to drain them. Spoon the entire contents of both cans over the cream cheese layer. You want a generous, abundant topping of cherries. Spread the cherry filling evenly, making sure it covers most of the white filling. Don’t be afraid to let some of the creamy filling peek through; it adds to the visual appeal. The deep red of the cherries against the white filling is what gives this dessert its name and its iconic look.
Once everything is assembled, cover the baking dish tightly with plastic wrap or a lid. It’s crucial to refrigerate the Cherries in the Snow for at least 4 hours, or preferably overnight. This chilling period allows the flavors to meld together beautifully and for the dessert to set properly. This step is essential for achieving the perfect texture. When it’s time to serve, the flavors will be harmonious, and the dessert will be firm enough to scoop easily.
Enjoy this wonderfully simple yet impressive dessert! It’s a testament to how a few basic ingredients can be transformed into something truly special.
Conclusion:
I hope you’re as excited as I am to try this delightful ‘Cherries in the Snow’ recipe! It’s truly a showstopper, offering a perfect balance of tart cherries and a sweet, creamy coconut base. The visual appeal is undeniable, with the vibrant red cherries peeking through the snowy white coconut, making it an ideal dessert for special occasions or simply when you want to add a touch of elegance to your table. This recipe is fantastic because it’s relatively simple to prepare yet yields an incredibly sophisticated and delicious result that’s sure to impress your guests.
We’ve explored some wonderful serving suggestions, from garnishing with fresh mint leaves or a dusting of powdered sugar for an extra flourish, to pairing it with a dollop of whipped cream or a scoop of vanilla bean ice cream. Don’t be afraid to experiment with variations, either! For a richer flavor, consider adding a splash of almond extract to the coconut mixture, or for a more complex taste, a hint of orange zest can elevate the cherry notes beautifully. I wholeheartedly encourage you to give ‘Cherries in the Snow’ a try; it’s a truly memorable dessert experience.
Frequently Asked Questions:
Can I use frozen cherries instead of fresh?
Absolutely! Frozen cherries work wonderfully in this recipe. Thaw them completely and drain off any excess liquid before incorporating them into the coconut mixture. The color might be slightly less vibrant, but the flavor will still be fantastic.
What’s the best way to store leftovers?
Leftover ‘Cherries in the Snow’ can be stored in an airtight container in the refrigerator for up to 3 days. The texture might change slightly as it sits, becoming a bit softer, but it will still be delicious.
Can I make this recipe dairy-free?
Yes, this recipe is naturally dairy-free as it uses coconut milk! Ensure your sweetened condensed milk substitute is also dairy-free if you are avoiding all dairy.
Cherries in the Snow
A light and airy dessert featuring layers of angel food cake, creamy filling, and sweet cherry topping.
Ingredients
-
8 ounces cream cheese, room temperature
-
1/2 cup powdered sugar
-
1/2 cup 2% milk
-
12 ounces Cool Whip whipped topping, thawed
-
1 pre-baked 9-inch angel food cake
-
2 cans cherry pie filling (21 ounces each)
Instructions
-
Step 1
In a large bowl, beat the cream cheese until smooth. Gradually beat in the powdered sugar and milk until well combined and smooth. -
Step 2
Gently fold in the thawed Cool Whip until just combined. Do not overmix. -
Step 3
Tear the angel food cake into bite-sized pieces and place half of the pieces in the bottom of a 9×13 inch baking dish. -
Step 4
Spoon half of the cream cheese mixture over the cake pieces. -
Step 5
Pour one can of cherry pie filling evenly over the cream cheese layer. -
Step 6
Repeat the layers with the remaining cake pieces, cream cheese mixture, and the second can of cherry pie filling. -
Step 7
Chill for at least 2 hours before serving.
Important Information
Nutrition Facts (Per Serving)
It is important to consider this information as approximate and not to use it as definitive health advice.
Allergy Information
Please check ingredients for potential allergens and consult a health professional if in doubt.